原文:Color Interpolation
Summary 很多时候,我们的模型需要使用多张纹理,并且同时应用这些纹理,例如地形材质。这时候我们需要通过一些插值的方法将这些纹理采集的颜色进行有效融合。
本教程是在上一个图片着色器 的基础上实现的。但是你也可以根据其基本思路,以表面着色器的形式重写其功能。
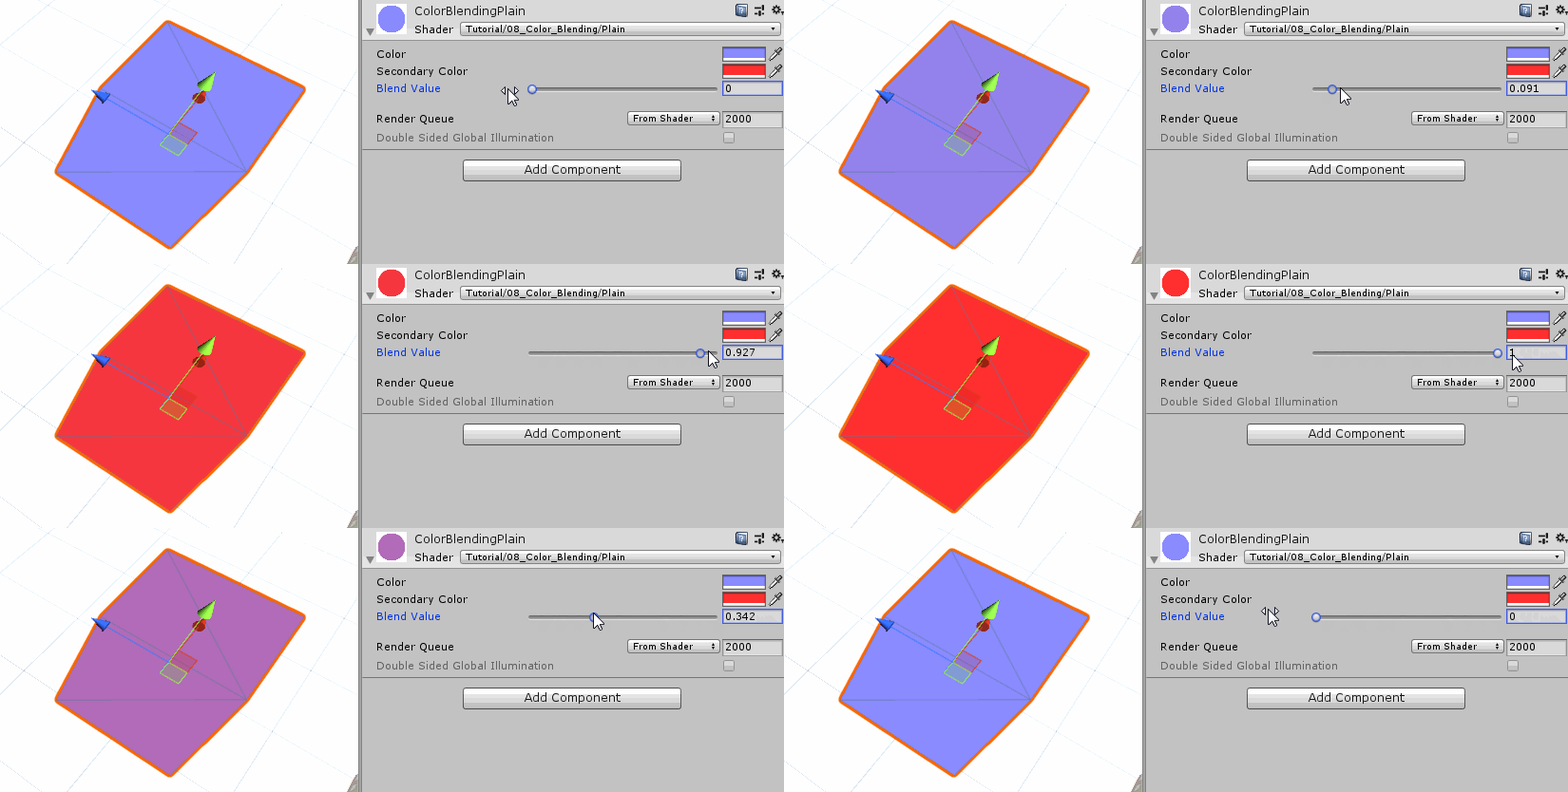
Interpolate Colors 首先,我们颜色混合着色器的第一个版本仅仅处理两个纯色之间的混合。因为这样我们就不需要考虑什么纹理、uv之类的。我们只需在加一个颜色变量、以及一个用于混合的参数,这个参数将决定两个颜色的混合权重,这里我们把它设为Range类,这样方便在材质面板上调节参数,同时确保参数的有效性。
1 2 3 4 5 6 7 8 9 10 11 12 13 14 15 16 17 18 19 20 21 22 23 24 25 26 Properties{ _Color ("Color" , Color) = (0 , 0 , 0 , 1 ) _SecondaryColor ("Secondary Color" , Color) = (1 ,1 ,1 ,1 ) _Blend ("Blend Value" , Range(0 ,1 )) = 0 } float _Blend;fixed4 _Color; fixed4 _SecondaryColor; `` 虽然我们没有使用纹理的颜色,但是也可以保留顶点着色器中关于UV变换的操作,下一个版本还会用到它。而作为第一个版本,我么只修改片段着色器就可以,直接根据混合参数,将第二种颜色叠加到原先的颜色上。 ```c++ fixed4 frag (v2f i) : SV_TARGET { fixed4 col = _Color + _SecondaryColor * _Blend; return col; }
!()[https://www.ronja-tutorials.com/assets/images/posts/009/BlendColorsAdd.gif]
现在我们可以看到混合后颜色的变化了,但是我们始终无法将其颜色完全过度到第二种颜色。这是因为混合参数只改变第二种颜色混入的颜色,而第一种颜色依然存在。
为了实现两种颜色之间的过渡渐变效果,我们需要保证两种颜色的权重和为1。
1 2 3 4 5 fixed4 frag (v2f i) : SV_TARGET { fixed4 col = _Color * (1 - _Blend) + _SecondaryColor * _Blend; return col; }
这种混合操作叫做线性插值,Unity内置的lerp函数就是实现这个线性插值功能。
1 2 3 4 5 fixed4 frag (v2f i) : SV_TARGET { fixed4 col = lerp(_Color, _SecondaryColor, _Blend); return col; }
最终两个颜色间的混合着色器源码如下:
1
2
3
4
5
6
7
8
9
10
11
12
13
14
15
16
17
18
19
20
21
22
23
24
25
26
27
28
29
30
31
32
33
34
35
36
37
38
39
40
41
42
43
44
45
46
47
48
49
50
51
52
53
54
55
56
57
Shader "Tutorial/009_Color_Blending/Plain" { Properties{ _Color ("Color" , Color) = (0 , 0 , 0 , 1 ) _SecondaryColor ("Secondary Color" , Color) = (1 ,1 ,1 ,1 ) _Blend ("Blend Value" , Range(0 ,1 )) = 0 } SubShader{ Tags{ "RenderType" ="Opaque" "Queue" ="Geometry" } Pass{ CGPROGRAM #include "UnityCG.cginc" #pragma vertex vert #pragma fragment frag float _Blend; fixed4 _Color; fixed4 _SecondaryColor; struct appdata { float4 vertex : POSITION; }; struct v2f { float4 position : SV_POSITION; }; v2f vert (appdata v) { v2f o; o.position = UnityObjectToClipPos(v.vertex); return o; } fixed4 frag (v2f i) : SV_TARGET { fixed4 col = lerp(_Color, _SecondaryColor, _Blend); return col; } ENDCG } } }
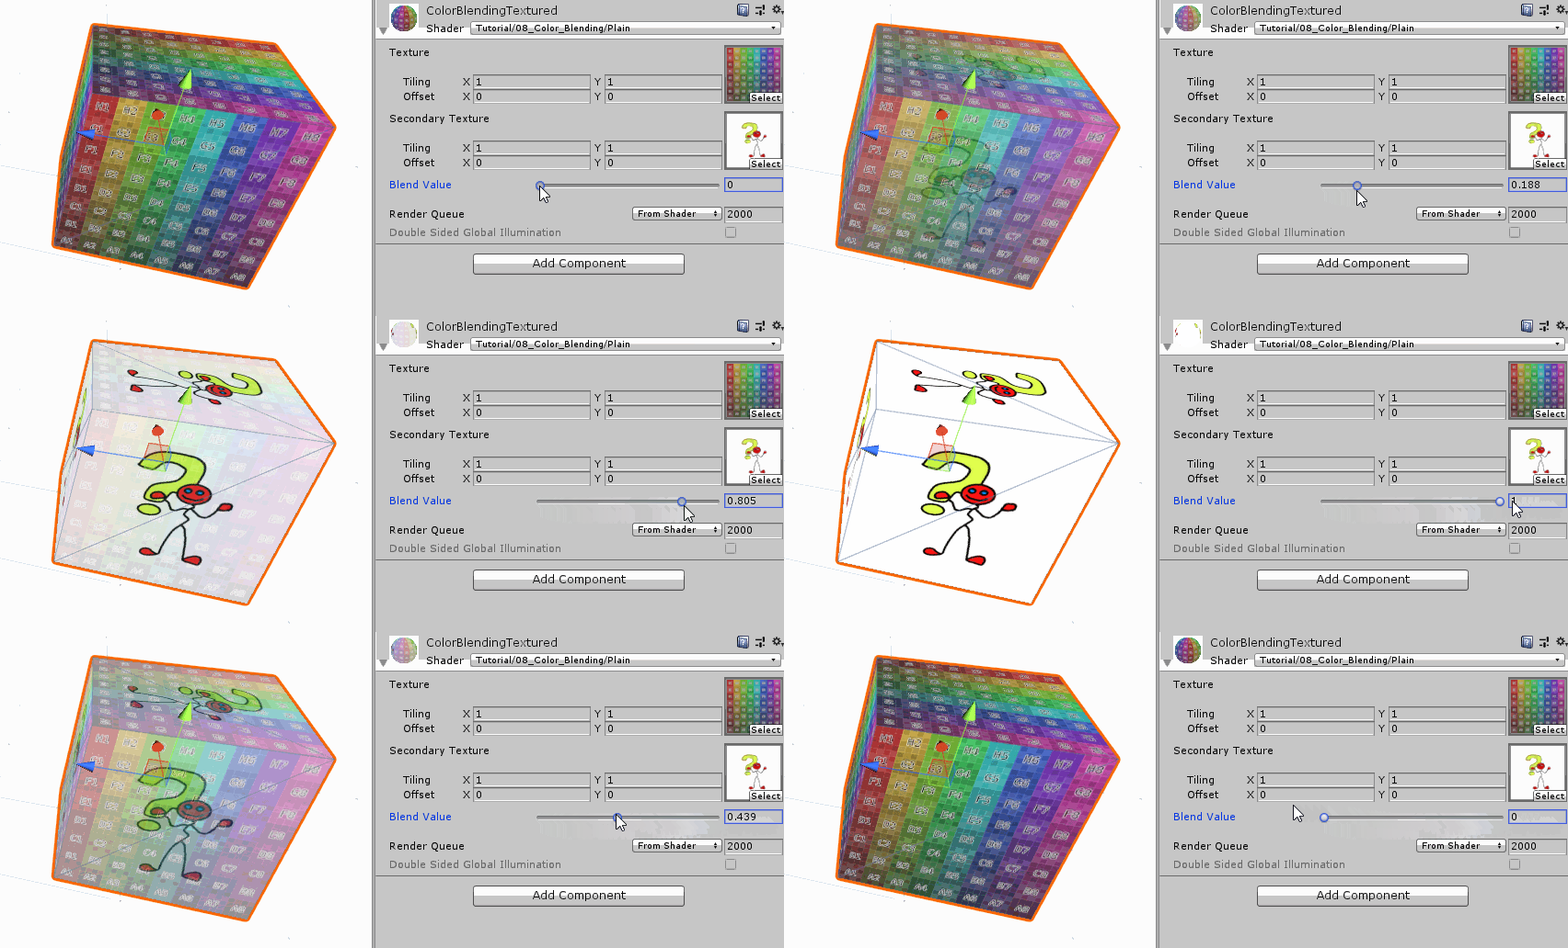
Interpolate Textures 我们颜色混合着色器的第二个版本将考虑混合两张纹理贴图的颜色。首先我们删掉前面两个颜色变量,改成两个纹理变量。因为涉及到纹理,所以需要uv坐标来进行纹理采样。之前的纹理采样都执行了uv变换操作,实际上这一步并不是必须的,如果我们不打算缩放纹理的话,这一步就可以省略掉,与之相关的纹理参数也可以省掉。但是我们这里有两张纹理,每张纹理都打算使用各自的缩放参数,这时候可以在顶点着色器中执行uv变换,然后在传给片段着色器,也可以直接在片段着色器中进行uv变换。
1 2 3 4 5 6 7 8 9 10 11 12 13 14 15 16 17 18 19 20 21 22 23 24 25 26 27 28 29 30 31 32 33 34 35 36 Properties{ _MainTex ("Texture" , 2 D) = "white" {} _SecondaryTex ("Secondary Texture" , 2 D) = "black" {} _Blend ("Blend Value" , Range(0 ,1 )) = 0 } #pragma vertex vert #pragma fragment frag struct appdata{ float4 vertex : POSITION; float2 uv : TEXCOORD0; }; struct v2f { float4 position : SV_POSITION; float2 uv : TEXCOORD0; }; v2f vert (appdata v) { v2f o; o.position = UnityObjectToClipPos(v.vertex); return o; }
这里我们是在片段着色其中进行uv变换的。并且使用各自变换后的uv进行纹理采样。在得到采样颜色后,我们就可以和上一个版本一样进行线性插值了。
1 2 3 4 5 6 7 8 9 10 11 12 13 14 fixed4 frag (v2f i) : SV_TARGET { float2 main_uv = TRANSFORM_TEX(i.uv, _MainTex); float2 secondary_uv = TRANSFORM_TEX(i.uv, _SecondaryTex); fixed4 main_color = tex2D(_MainTex, main_uv); fixed4 secondary_color = tex2D(_SecondaryTex, secondary_uv); fixed4 col = lerp(main_color, secondary_color, _Blend); return col; }
下面是我们这个图片混合着色器的完整脚本:
1
2
3
4
5
6
7
8
9
10
11
12
13
14
15
16
17
18
19
20
21
22
23
24
25
26
27
28
29
30
31
32
33
34
35
36
37
38
39
40
41
42
43
44
45
46
47
48
49
50
51
52
53
54
55
56
57
58
59
60
61
62
63
64
65
66
67
68
69
70
71
72
Shader "Tutorial/009_Color_Blending/Texture" { Properties{ _MainTex ("Texture" , 2 D) = "white" {} _SecondaryTex ("Secondary Texture" , 2 D) = "black" {} _Blend ("Blend Value" , Range(0 ,1 )) = 0 } SubShader{ Tags{ "RenderType" ="Opaque" "Queue" ="Geometry" } Pass{ CGPROGRAM #include "UnityCG.cginc" #pragma vertex vert #pragma fragment frag float _Blend; sampler2D _MainTex; float4 _MainTex_ST; sampler2D _SecondaryTex; float4 _SecondaryTex_ST; struct appdata { float4 vertex : POSITION; float2 uv : TEXCOORD0; }; struct v2f { float4 position : SV_POSITION; float2 uv : TEXCOORD0; }; v2f vert (appdata v) { v2f o; o.position = UnityObjectToClipPos(v.vertex); o.uv = v.uv; return o; } fixed4 frag (v2f i) : SV_TARGET { float2 main_uv = TRANSFORM_TEX(i.uv, _MainTex); float2 secondary_uv = TRANSFORM_TEX(i.uv, _SecondaryTex); fixed4 main_color = tex2D(_MainTex, main_uv); fixed4 secondary_color = tex2D(_SecondaryTex, secondary_uv); fixed4 col = lerp(main_color, secondary_color, _Blend); return col; } ENDCG } } }
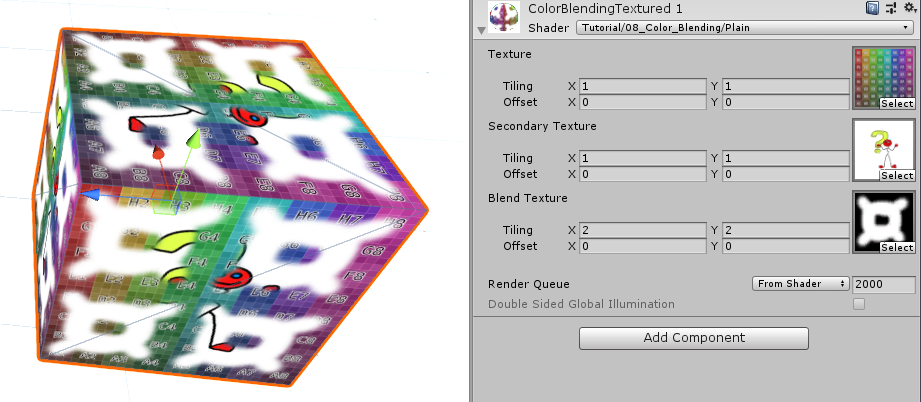
Interpolation based on a Texture 前面连个的混合参数都是一个统一的变量,这样模型表面每个区域的混合权重都一样。为了达到不同权重的混合效果,最后这个版本使用纹理来作为我们的混合参数。
首先我们是将原先的混合变量用一个纹理变量替代。
1 2 3 4 5 6 7 8 9 10 11 12 13 14 15 16 17 18 19 20 21 22 23 Properties{ _MainTex ("Texture" , 2 D) = "white" {} _SecondaryTex ("Secondary Texture" , 2 D) = "black" {} _BlendTex ("Blend Texture" , 2 D) = "grey" } sampler2D _BlendTex; float4 _BlendTex_ST; sampler2D _MainTex; float4 _MainTex_ST; sampler2D _SecondaryTex; float4 _SecondaryTex_ST;
同样的,我们也对权重图进行uv变换,然后再进行采样。但是纹理采样的结果还是颜色,是一个向量,而我们的插值权重是一个标量,这时候我们可以选择其中一个合适的通道值来作为我们的插值权重。和前面一样,最后我们用这个权重值进行颜色插值。
1 2 3 4 5 6 7 8 9 10 11 12 13 14 15 16 17 18 19 fixed4 frag (v2f i) : SV_TARGET { float2 main_uv = TRANSFORM_TEX(i.uv, _MainTex); float2 secondary_uv = TRANSFORM_TEX(i.uv, _SecondaryTex); float2 blend_uv = TRANSFORM_TEX(i.uv, _BlendTex); fixed4 main_color = tex2D(_MainTex, main_uv); fixed4 secondary_color = tex2D(_SecondaryTex, secondary_uv); fixed4 blend_color = tex2D(_BlendTex, blend_uv); fixed blend_value = blend_color.r; fixed4 col = lerp(main_color, secondary_color, blend_value); return col; }
好了,下面是完整的着色器脚本:
1
2
3
4
5
6
7
8
9
10
11
12
13
14
15
16
17
18
19
20
21
22
23
24
25
26
27
28
29
30
31
32
33
34
35
36
37
38
39
40
41
42
43
44
45
46
47
48
49
50
51
52
53
54
55
56
57
58
59
60
61
62
63
64
65
66
67
68
69
70
71
72
73
74
75
76
77
78
Shader "Tutorial/009_Color_Blending/TextureBasedBlending" { Properties{ _MainTex ("Texture" , 2 D) = "white" {} _SecondaryTex ("Secondary Texture" , 2 D) = "black" {} _BlendTex ("Blend Texture" , 2 D) = "grey" } SubShader{ Tags{ "RenderType" ="Opaque" "Queue" ="Geometry" } Pass{ CGPROGRAM #include "UnityCG.cginc" #pragma vertex vert #pragma fragment frag sampler2D _BlendTex; float4 _BlendTex_ST; sampler2D _MainTex; float4 _MainTex_ST; sampler2D _SecondaryTex; float4 _SecondaryTex_ST; struct appdata { float4 vertex : POSITION; float2 uv : TEXCOORD0; }; struct v2f { float4 position : SV_POSITION; float2 uv : TEXCOORD0; }; v2f vert (appdata v) { v2f o; o.position = UnityObjectToClipPos(v.vertex); o.uv = v.uv; return o; } fixed4 frag (v2f i) : SV_TARGET { float2 main_uv = TRANSFORM_TEX(i.uv, _MainTex); float2 secondary_uv = TRANSFORM_TEX(i.uv, _SecondaryTex); float2 blend_uv = TRANSFORM_TEX(i.uv, _BlendTex); fixed4 main_color = tex2D(_MainTex, main_uv); fixed4 secondary_color = tex2D(_SecondaryTex, secondary_uv); fixed4 blend_color = tex2D(_BlendTex, blend_uv); fixed blend_value = blend_color.r; fixed4 col = lerp(main_color, secondary_color, blend_value); return col; } ENDCG } } }
希望本文能让你了解着色器中颜色的基本使用、以及插值的实际应用。
所有的源码都在以下链接可以找到:
希望你能喜欢这个教程哦!如果你想支持我,可以关注我的推特 ,或者通过ko-fi 、或patreon 给两小钱。总之,各位大爷,走过路过不要错过,有钱的捧个钱场,没钱的捧个人场:-)!!!


