原文:
Postprocessing with Normal Texture
Summary
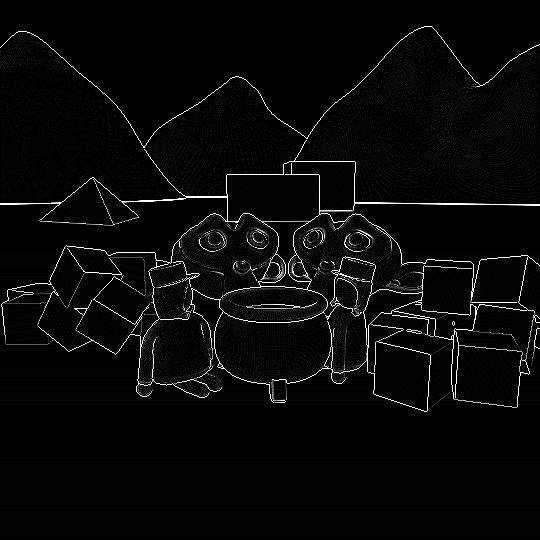
边界后处理算是我最喜欢的后处理了。通过后处理的方式实现边缘绘制有很多优势,不需要修改模型原本的材质着色器,边缘检测的效果相比也更好。
阅读本文前,需要掌握深度法向纹理相关的知识,如果你不曾了解,建议你阅读我之前的教程。
Depth Outlines
这里我们还是沿续上一篇关于深度法向贴图的教程,并且使用之前的脚本。
首先我们将上一个教程中关于顶部着色的部分删掉,与之相关的变量也可以删掉,还有后处理脚本中的变换矩阵。然后我们将片段着色器中计算深度和法向之后的所有代码删除掉。
1
2
3
4
|
Properties{
[HideInInspector]_MainTex ("Texture", 2D) = "white" {}
}
|
1
2
3
4
5
6
7
8
9
10
11
12
13
|
fixed4 frag(v2f i) : SV_TARGET{
float4 depthnormal = tex2D(_CameraDepthNormalsTexture, i.uv);
float3 normal;
float depth;
DecodeDepthNormal(depthnormal, depth, normal);
depth = depth * _ProjectionParams.z;
}
|
然后删除后处理脚本中的向着色器传递矩阵的命令。
1
2
3
4
5
|
private void OnRenderImage(RenderTexture source, RenderTexture destination){
Graphics.Blit(source, destination, postprocessMaterial);
}
|
计算轮廓的方法是对判断定点周围进行采样,然后对比其与周围点之间的深度、法向差,差别越大,是轮廓点的概率就越大。
对周围点进行准确采样,首先我们需要知道纹理的大小,因为采样时使用的UV坐标,其范围是0-1,需要根据纹理大小计算单个像素的uv步长。而这个纹理大小的参数和之前提到的纹理缩放偏移参数类似,都是和纹理相关的,所以有一定的命名规则。这个规则就是纹理变量的名称加上_TexelSize后缀。
1
2
3
4
|
sampler2D _CameraDepthNormalsTexture;
float4 _CameraDepthNormalsTexture_TexelSize;
|
然后我们针对当前采样点偏移几个像素,计算其周围采样点的值。
1
2
3
4
5
6
7
|
float4 neighborDepthnormal = tex2D(_CameraDepthNormalsTexture,
uv + _CameraDepthNormalsTexture_TexelSize.xy * offset);
float3 neighborNormal;
float neighborDepth;
DecodeDepthNormal(neighborDepthnormal, neighborDepth, neighborNormal);
neighborDepth = neighborDepth * _ProjectionParams.z;
|
然后我们求这两个采样点之间的差,并显示到屏幕上。
1
2
| float difference = depth - neightborDepth;
return difference;
|
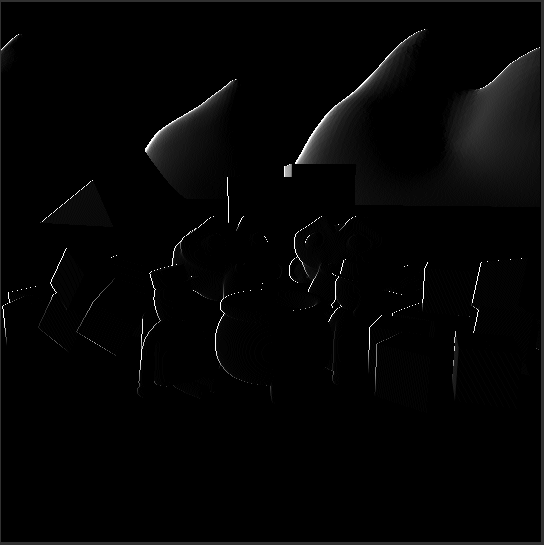
在上图中我们提取了图片左侧的轮廓。在处理剩下的采样点之前,我们先把采样部分的代码封装成一个函数,这样我们就不需要重复写这一段共同的代码了。这个函数需要中心点的深度值、uv、以及像素偏移值。
然后我们将片段着色其中的代码拷贝到我们新创建的函数中,并且把相应部分的变量调整一下。然后在片段着色器中调用这个函数。
1
2
3
4
5
6
7
8
9
10
11
| void Compare(float baseDepth, float2 uv, float2 offset){
float4 neighborDepthnormal = tex2D(_CameraDepthNormalsTexture,
uv + _CameraDepthNormalsTexture_TexelSize.xy * offset);
float3 neighborNormal;
float neighborDepth;
DecodeDepthNormal(neighborDepthnormal, neighborDepth, neighborNormal);
neighborDepth = neighborDepth * _ProjectionParams.z;
return baseDepth - neighborDepth;
}
|
1
2
3
| float depthDifference = Compare(depth, i.uv, float2(1, 0));
return depthDifference;
|
修改完后运行程序,会发现效果和原来的一样,但是我们可以使用Compare快速的选择其他采样点。例如这里的上下左右四个方向,然后将所有结果求和。
1
2
3
4
5
6
7
8
9
10
11
12
13
14
15
16
17
18
19
20
|
fixed4 frag(v2f i) : SV_TARGET{
float4 depthnormal = tex2D(_CameraDepthNormalsTexture, i.uv);
float3 normal;
float depth;
DecodeDepthNormal(depthnormal, depth, normal);
depth = depth * _ProjectionParams.z;
float depthDifference = Compare(depth, i.uv, float2(1, 0));
depthDifference = depthDifference + Compare(depth, i.uv, float2(0, 1));
depthDifference = depthDifference + Compare(depth, i.uv, float2(0, -1));
depthDifference = depthDifference + Compare(depth, i.uv, float2(-1, 0));
return depthDifference;
}
|
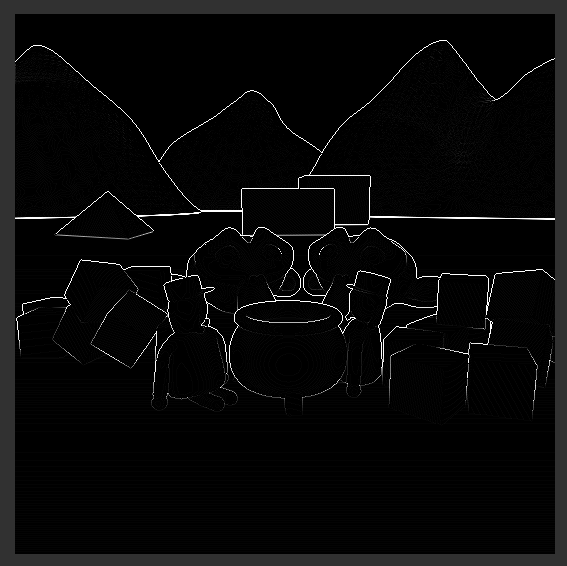
Normal Outlines
使用深度图得到的轮廓已经蛮清晰了,但是我们还可以进一步使用法向数据来计算轮廓。我们同样是在Compare函数中实现法向采样,因为函数只能返回一个值,所以我们这里使用inout来返回结果。另外我们还需要向函数中传递中心点的法向,来求解其与周边的差值。
1
2
3
4
| void Compare(inout float depthOutline, inout float normalOutline, float baseDepth, float3 baseNormal, float2 uv, float2 offset)
{
}
|
现在我们的Compare函数已经可以处理深度和法向两种计算轮廓的数据,那么我们也需要在片段着色器中做相应的改动。
1
2
3
4
5
6
7
8
9
10
11
12
13
| void Compare(inout float depthOutline, inout float normalOutline,
float baseDepth, float3 baseNormal, float2 uv, float2 offset){
float4 neighborDepthnormal = tex2D(_CameraDepthNormalsTexture,
uv + _CameraDepthNormalsTexture_TexelSize.xy * offset);
float3 neighborNormal;
float neighborDepth;
DecodeDepthNormal(neighborDepthnormal, neighborDepth, neighborNormal);
neighborDepth = neighborDepth * _ProjectionParams.z;
float depthDifference = baseDepth - neighborDepth;
depthOutline = depthOutline + depthDifference;
}
|
1
2
3
4
5
6
7
8
9
| float depthDifference = 0;
float normalDifference = 0;
Compare(depthDifference, normalDifference, depth, normal, i.uv, float2(1, 0));
Compare(depthDifference, normalDifference, depth, normal, i.uv, float2(0, 1));
Compare(depthDifference, normalDifference, depth, normal, i.uv, float2(0, -1));
Compare(depthDifference, normalDifference, depth, normal, i.uv, float2(-1, 0));
return depthDifference;
|
上面对代码结构进行扩展,但是并没有改变实际的功能,因此输出的结果没有什么变化。现在我们继续处理临近点法向的差,求法向的差最简单且方便的做法是计算两个法向之间的点乘。法向越接近点乘越大,完全逆向时点乘为-1。这里我们希望差异越大越接近1,差异越小越接近0,所以需要做一个数值映射。ps:不过下面的法向差并不是通过点乘来实现的。
1
2
3
| float3 normalDifference = baseNormal - neighborNormal;
normalDifference = normalDifference.r + normalDifference.g + normalDifference.b;
normalOutline = normalOutline + normalDifference;
|
1
| return normalDifference;
|
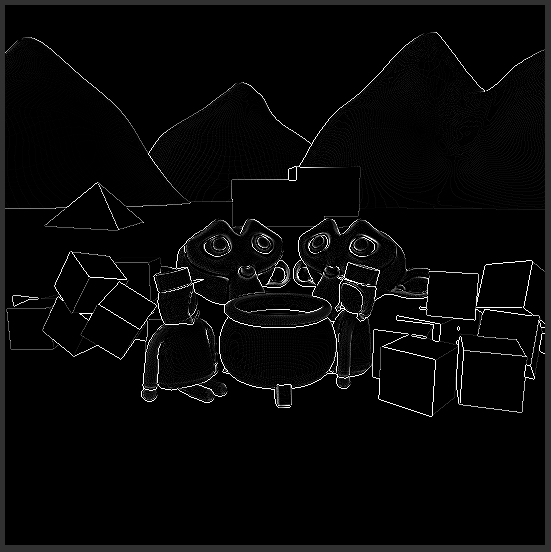
上面得到的基于法向纹理的边缘检测结果和基于深度的有所不同,我们可以将两者结合得到一个更加清晰的轮廓。
1
| return depthDifference + normalDifference;
|
Customizable Outlines
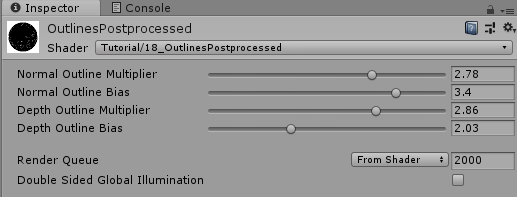
我们基本上实现了边缘绘制的效果,但是我们还可以加一些可控参数来对最终的轮廓效果进行微调。这里我们分别针对深度、法向轮廓引入两个因子,来控制两者的强弱,还有两个偏移量,来剔除弱边缘。
1
2
3
4
5
6
7
8
|
Properties{
[HideInInspector]_MainTex ("Texture", 2D) = "white" {}
_NormalMult ("Normal Outline Multiplier", Range(0,4)) = 1
_NormalBias ("Normal Outline Bias", Range(1,4)) = 1
_DepthMult ("Depth Outline Multiplier", Range(0,4)) = 1
_DepthBias ("Depth Outline Bias", Range(1,4)) = 1
}
|
1
2
3
4
5
|
float _NormalMult;
float _NormalBias;
float _DepthMult;
float _DepthBias;
|
这四个变量是在片段着色器中使用的,当计算完中心点与所有方向的临近点的差值后,将其乘以上面的因子,然后将结果限制在0-1之间,最后使用指数函数,来弱化弱边缘。最终将两种边缘求和。
1
2
3
4
5
6
7
8
9
| depthDifference = depthDifference * _DepthMult;
depthDifference = saturate(depthDifference);
depthDifference = pow(depthDifference, _DepthBias);
normalDifference = normalDifference * _NormalMult;
normalDifference = saturate(normalDifference);
normalDifference = pow(normalDifference, _NormalBias);
return depthDifference + normalDifference;
|
现在我们可以在材质面板上控制这些参数,从而对轮廓效果进行微调。

最后我们想给轮廓上色,同时将轮廓叠加到原图上。所以我们要定义一个轮廓颜色变量。
1
| _OutlineColor ("Outline Color", Color) = (0,0,0,1)
|
我们只需要在片段着色其中对原图进行采样,然后根据轮廓值,对原图和轮廓颜色进行插值,轮廓值为1的采用轮廓颜色,为0的采用原图颜色。
1
2
3
4
| float outline = normalDifference + depthDifference;
float4 sourceColor = tex2D(_MainTex, i.uv);
float4 color = lerp(sourceColor, _OutlineColor, outline);
return color;
|

使用后处理来实现轮廓效果有一个弊端,就是整个场景画面会无差别的执行轮廓效果。你无法指定哪些物体使用轮廓线,哪些不使用。而且容易出现锯齿等不自然的表现。
虽然无差别执行轮廓效果的问题不容易解决,但是锯齿类的问题可以使用FXAA或TXAA来避免。
另一个需要牢记的点是,后处理轮廓只适用于哪些表面较为光滑的模型。对于那些表面细节过多的模型,其表面细节轮廓被过度绘制,导致整个画面都是线条,这可能不是你想要的结果。
Source
1
2
3
4
5
6
7
8
9
10
11
12
13
14
15
16
17
18
19
20
21
22
23
24
25
26
27
28
29
30
31
32
33
34
35
36
37
38
39
40
41
42
43
44
45
46
47
48
49
50
51
52
53
54
55
56
57
58
59
60
61
62
63
64
65
66
67
68
69
70
71
72
73
74
75
76
77
78
79
80
81
82
83
84
85
86
87
88
89
90
91
92
93
94
95
96
97
98
99
100
101
102
103
104
105
106
107
108
109
110
111
112
113
114
115
116
117
118
119
| Shader "Tutorial/019_OutlinesPostprocessed"
{
Properties{
[HideInInspector]_MainTex ("Texture", 2D) = "white" {}
_OutlineColor ("Outline Color", Color) = (0,0,0,1)
_NormalMult ("Normal Outline Multiplier", Range(0,4)) = 1
_NormalBias ("Normal Outline Bias", Range(1,4)) = 1
_DepthMult ("Depth Outline Multiplier", Range(0,4)) = 1
_DepthBias ("Depth Outline Bias", Range(1,4)) = 1
}
SubShader{
Cull Off
ZWrite Off
ZTest Always
Pass{
CGPROGRAM
#include "UnityCG.cginc"
#pragma vertex vert
#pragma fragment frag
sampler2D _MainTex;
sampler2D _CameraDepthNormalsTexture;
float4 _CameraDepthNormalsTexture_TexelSize;
float4 _OutlineColor;
float _NormalMult;
float _NormalBias;
float _DepthMult;
float _DepthBias;
struct appdata{
float4 vertex : POSITION;
float2 uv : TEXCOORD0;
};
struct v2f{
float4 position : SV_POSITION;
float2 uv : TEXCOORD0;
};
v2f vert(appdata v){
v2f o;
o.position = UnityObjectToClipPos(v.vertex);
o.uv = v.uv;
return o;
}
void Compare(inout float depthOutline, inout float normalOutline,
float baseDepth, float3 baseNormal, float2 uv, float2 offset){
float4 neighborDepthnormal = tex2D(_CameraDepthNormalsTexture,
uv + _CameraDepthNormalsTexture_TexelSize.xy * offset);
float3 neighborNormal;
float neighborDepth;
DecodeDepthNormal(neighborDepthnormal, neighborDepth, neighborNormal);
neighborDepth = neighborDepth * _ProjectionParams.z;
float depthDifference = baseDepth - neighborDepth;
depthOutline = depthOutline + depthDifference;
float3 normalDifference = baseNormal - neighborNormal;
normalDifference = normalDifference.r + normalDifference.g + normalDifference.b;
normalOutline = normalOutline + normalDifference;
}
fixed4 frag(v2f i) : SV_TARGET{
float4 depthnormal = tex2D(_CameraDepthNormalsTexture, i.uv);
float3 normal;
float depth;
DecodeDepthNormal(depthnormal, depth, normal);
depth = depth * _ProjectionParams.z;
float depthDifference = 0;
float normalDifference = 0;
Compare(depthDifference, normalDifference, depth, normal, i.uv, float2(1, 0));
Compare(depthDifference, normalDifference, depth, normal, i.uv, float2(0, 1));
Compare(depthDifference, normalDifference, depth, normal, i.uv, float2(0, -1));
Compare(depthDifference, normalDifference, depth, normal, i.uv, float2(-1, 0));
depthDifference = depthDifference * _DepthMult;
depthDifference = saturate(depthDifference);
depthDifference = pow(depthDifference, _DepthBias);
normalDifference = normalDifference * _NormalMult;
normalDifference = saturate(normalDifference);
normalDifference = pow(normalDifference, _NormalBias);
float outline = normalDifference + depthDifference;
float4 sourceColor = tex2D(_MainTex, i.uv);
float4 color = lerp(sourceColor, _OutlineColor, outline);
return color;
}
ENDCG
}
}
}
|
1
2
3
4
5
6
7
8
9
10
11
12
13
14
15
16
17
18
19
20
21
22
23
| using UnityEngine;
using System;
public class OutlinesPostprocessed : MonoBehaviour {
[SerializeField]
private Material postprocessMaterial;
private Camera cam;
private void Start(){
cam = GetComponent<Camera>();
cam.depthTextureMode = cam.depthTextureMode | DepthTextureMode.DepthNormals;
}
private void OnRenderImage(RenderTexture source, RenderTexture destination){
Graphics.Blit(source, destination, postprocessMaterial);
}
}
|
希望我的教程能够对你有所帮助。
你可以在以下链接找到源码:
https://github.com/ronja-tutorials/ShaderTutorials/blob/master/Assets/019_OutlinesPostprocessed/OutlinesPostprocessed.shader
https://github.com/ronja-tutorials/ShaderTutorials/blob/master/Assets/019_OutlinesPostprocessed/OutlinesPostprocessed.cs
希望你能喜欢这个教程哦!如果你想支持我,可以关注我的推特,或者通过ko-fi、或patreon给两小钱。总之,各位大爷,走过路过不要错过,有钱的捧个钱场,没钱的捧个人场:-)!!!