0%

package

unity-rpg-combat-system
RPG-Core-Combat-Systems
3rd-Person-Combat-demo
unity-runtime-debug-action
BennyKok
KrazyL
如何实现一个灵活、通用的战斗(技能)系统——序章
EGamePlay
unity+combat
gucheng0712
gucheng0712
huailiang
CombatDesigner
Unity常见插件汇总
Everyone loves a good story
fungus


ALEXTANG
UnityMeshSimplifier
ComponentAutoBindTool
UnityToolchainsTrick
openstash背包
NavMesh
ChangeEQForUnity
dongweiPeng
SkillSystem
plato
技能编辑器
Unity游戏开发资源
帧同步技术
unity-gameplay-ability-system对标UE里面的GAS
unity-guid-regenerator
AssetsTools.NET
Unity-Drag-and-Drop
Unity-FPS
MeshMaker
Unity-Ability-System


sunbrando
ParticleEffectProfilerUnity 特效性能分析工具
ThisisGame
GameDevTools
ElonGame
剧情-技能编辑器
unity-ability-system
UnityTutorials-RTS
UnityTutorials-BehaviourTrees
MinaPecheux
Unity Procedural IK Wall Walking Spider
UnityGameplayAbilitySystem
Undercooked🍴🍅 Fan-made cooking game! 🍔🥣
UnityAStarNavigation
Jeffrey Vella
XCharts
VirturalTextureFast
waterReflectionBillBoard一种手游可用的 高性能简化水面反射
knead_proj游戏中捏脸的实现
UnityEditorScripts
ParticleEffectForUGUI
UIEffect
Multiplayer-FPS


KDTree
UnityWaveEquation
SevenZip
ServerFramework
GroundGrowing
UnityWireframeRenderer
UnityDemo_Splatoon2Unity仿Splatoon喷漆效果
Unity-Human-Skin-Shader-PC
GPUAOBaker基于GPU的AO烘焙实现
Houdini Engine for Unity
JoystickUnity 使用有限状态机 完美还原 王者荣耀 虚拟摇杆
Procedural Voxel Terrain Generation
UnySplat
法术系统
Animation Texture Baker for Unity
GameDesignPattern_U3D_Version
Fractal-Lightning-UnityUnity中的分形闪电
Unity3D.IncrementalCompiler
GizmoExtensions
WaterByBakeDepth基于预渲染顶点色的水编辑器


Cs2Lua
UnityWireFrame
AutoLOD
UnityDemo_SplatoonUnity5的一个Demo, 模拟主机上的喷射战士
protobuf-net-gc-optimizationprotobuf-net无gc优化版本,另外还提供了一些无gc自定义数据结构,以及对Unity3D中c#代码的各种无gc使用方式测试。
Server emulation for Age of Empires Online
quick_psd2ugui
TurnRound3D效果的卡牌旋转切换
SkinnerSpecial Effects with Skinned Mesh in Unity
Spherical-Gravity
UnityAvaterUnity中Avatar换装实现
unity-ads-demo广告
UnityQuadTreePlanet
dotween
StateMachine
StateMachineController
Ultimate-ARPG

Geometry

Math

OpenGL Projection Matrix:Opengl中的矩阵应用;
欧拉公式 e^{ik}=cos(k)+isin(k) 的来历是什么?:欧拉公式;
线性方程组矩阵解法:线性方程组矩阵解法;
判断线段是否相交并求交点:判断线段是否相交并求交点;
The ryg blog
Circular Harmonics
Algorithms for Competitive Programming

Noise

Poisson Disk Sampling:泊松采样;
Warping:Warping, or dommain distortion is a very common technique in computer graphics for generating procedural textures and geometry;
2D noise:These are some quick & dirty experiments I did with 2D noise;
OpenSimplex 2:Successors to OpenSimplex Noise, plus updated OpenSimplex;

Polygon

Even–odd rule:奇偶法判定点与多边形的关系;
Polygon Clipping (Part 1):多边形布尔运算;
Polygon Clipping (Part 2):多边形布尔运算;
Barend’s Blog:多边形布尔运算;
Concave Polygon Intersection - Algorithm:多边形布尔运算;
PNPOLY - Point Inclusion in Polygon Test W. Randolph Franklin (WRF):…;

Mesh

Meshing in a Minecraft Game:网格合并贪心算法;
planet generator:行星网格;
Evelios Development:地图网格生成;
Exploring procedural generation and display of fantasy maps:地图生成;
Procedural Terrain Generation With Voronoi Diagrams:地图生成;
a map generator based on Voronoi diagrams:地图生成;
Map generator based on Voronoi Diagram and Perlin noise:地图生成;
VoronoiLib:C# implementation of Fortune’s Algorithm;
Terrain Generation 3: Voronoi Diagrams:generating a small number of large Voronoi cells as tectonic plates;
ManyLandsGenerator:The Random Island Generator being developed for use in The Rogue Sea;
Unity-delaunay:Port of as3delaunay to C# for Unity;
miniHexMap:Create, edit, generate hex mesh in Unity Editor mode;
Delaunator guide:a fast library for Delaunay triangulation;
#csDelaunay:This is a refactoring of PouletFrit’s C# port of as3delaunay;
csDelaunay:This is a port and interpretation of actionscript library as3delaunay;
VoronoiUnityDOTS:Fortune’s Voronoi diagram for Unity DOTS (Job System, Burst Compiler) - WIP;
Terrain erosion sandbox in WebGl:Erosion simulation in Web Browser;

Path

A* Pathfinding Project
Study: Navigation Mesh Generation
Study-Navigation-Mesh-Generation
NavMesh
navMesh
unity-nav-mesh
Unity-NavMeshAgent-SelfDriving
NavMeshWith2D
Components for Runtime NavMesh Building
NavigationMesh
Digesting Duck
recastnavigation
Nav Mesh Avoidance
Custom Nav Mesh
Euclidean Shortest Paths:避障寻路;
Motion Planning, Part IV Graph Search Part II:路径规划;
A Comparison of High-Level Approaches for Speeding Up Pathfinding:寻路优化;
TRANSIT: Ultrafast Shortest-Path Queries with Linear-Time Preprocessing:寻路;
TRANSIT Routing on Video Game Maps:寻路;
Shortest Path:寻路;
Hierarchical Path Planning for Multi-Size Agents in Heterogeneous Environments:寻路;
Fully Dynamic Constrained Delaunay Triangulations:寻路;
Route Planning in Road Networks:路网寻路方案;
Computing the Sortest Path: A* Search Meets Graph Theory:A寻路;
Hierarchical A*: Searching Abstraction Hierarchies Efficiently:A
寻路算法优化;
Introduction to the A* Algorithm:Introduction to the A* Algorithm;
Creating natural paths on terrains using pathfinding:道路自动生成;
Dijkstra’s shortest path algorithm | Greedy Algo-7
Dijkstra’s Shortest Path Algorithm - A Detailed and Visual Introduction

Graphs

Algorithm for Computing Visibility Graphs:基于障碍物构造图;
Visibility graphs:视线图;
spherical_voronoi_core:Voronoi Tessellation of the Sphere;

Game

Unity Open Project
Unity Open Projects
GameDev Academy
Game Dev
Fighting Game 3d Multiplayer Unity3D
SimpleMultiplayerProject
Heroes of the Skills
Neuroevolution of 2-legged creatures learning to walk further-faster

SLG

pvigier’s blog:地图自动生成、寻路等一套完整的解决方案;
The SimBlob Project:地图自动生成、寻路等一套完整的解决方案;
The Colonists:游戏;
Factory Town:游戏;
The Battle of Polytopia:游戏;
文明VI: 新纪元季票:游戏;
Banished:一些设计实现思路;
stratagus:The Stratagus strategy game engine;
turn based military strategy games:搜索游戏;
Turn-Based ToolKit (TBTK):子走棋;
Light baked Prefabs & other tips to get 60 fps on low-end phones:tips from Michelle Martin, software engineer at MetalPop Games, on how to optimize games for a range of mobile devices, so you can reach as many potential players as possible;
Extinction Eclipse
Michael Ganzorig

Render

Color

Linear, Gamma and sRGB Color Spaces:详细解释了线性颜色空间和gamma颜色空间。
Studying Gamut Clipping:色域裁剪研究,用于将颜色限定在有效范围内;
LUTs

Lighting

Spherical Harmonics:球谐函数原理;
Stupid Spherical Harmonics (SH) Tricks:球谐函数原理;
Spherical Harmonic Lighting:球谐函数在光照中的应用;
Spherical Harmonics Lighting:球谐函数光照应用;
Spherical Harmonics Lighting: Part I:球谐函数光照应用;
Spherical Harmonic Lighting: The Gritty Details:球谐函数光照应用;
In-Depth: Spherical Harmonic Lighting:球鞋函数;
SG SERIES PART 1: A BRIEF (AND INCOMPLETE) HISTORY OF BAKED LIGHTING REPRESENTATIONS:烘焙光照介绍;
ppsloan:一系列光照相关资料;
Physically Based Rendering:From Theory To Implementation:物理光照;
Physically Based Rendering Algorithms: A Comprehensive Study In Unity3D:物理光照详解;
Graphics Rendering Pipeline:渲染管线;
HLSL固有函数 【Intrinsic Functions (DirectX HLSL)】:HLSL固有函数;
The Blinn-Phong Normalization Zoo:The Blinn-Phong Normalization Zoo;

Shader

Custom Lighting in Shader Graph: Expanding your graphs in 2019
How To Use Every Node in Unity Shader Graph
Test_ShaderGraphBlog
Using post-processing effects in Unity
Interior Mapping
Interior Mapping
DepthInverseProjection:深度重构
The Book of Shaders
Harry Alisavakis的博客:一些着色器学习例子
Creating A Stylized Waterfall in Unity: Part 1:Math Roodhuizen allowed us to repost his guide to creating a RiME-style waterfall in Unity, Amplify Shader Editor, and Maya;
Particle Metaballs in Unity using URP and Shader Graph Part 1:This series will explain how to draw Metaballs in Unity using the Universal Render Pipeline (URP) and Shader Graph;
Rendering Implicit Surfaces and Distance Fields: Sphere Tracing:Rendering Implicit Surfaces and Distance Fields: Sphere Tracing;
Shader Tutorials by Ronja:The focus of this tutorials is on unity shaders with hlsl;
depth:This post goes over everything about depth that I’ve come across (so you could say it’s an in-depth post about depth!), mainly focusing on Unity and the Universal RP (but also includes some High Definition RP stuff). Includes info for both Shader Graph and URP Shader Code (HLSL).
Water simulation

AI

GPGOAP:面向目标的行为规划;
Goal-Oriented Action Planning (GOAP)
ReGoap:Generic C# GOAP (Goal Oriented Action Planning) library with Unity3d examples;
Curvature
ReflexityAI
UnrealUtilityAI
Goal Oriented Action Planning for a Smarter AI
Goal Oriented Action Planning Instructions

Data Struct

Tree

JavaScript QuadTree Implementation:四叉树;
VP Tree

Queue

High-Speed-Priority-Queue-for-C-Sharp
Priority Queue
How to design a Priority Queue in C#
Priority Queues with C#

Algorithm

Sort

Quick Sort
Quick Sort Algorithm
Data Structure and Algorithms - Quick Sort

AOI

Advanced uses of the MMORoom and MMO API
ARTIFICIAL INTELLIGENCE FOR GAMES

Fog

How To: Implement a Fog of War – Part 1 – Chunky
Lode Storm – Implementing classic fog of war
fog-of-war
Advanced Fog of War
Unreal Engine 4 Fog Of War Tutorial – Ready To Use
Fog Of War in Unity

Engine

Unity

BRONSON ZGEB
DAMIEN MAYANCE
How to use Native Code in Unity
Unity Audio Clip Import Settings For The Best Performance
Unity IL2CPP发布64位,以及代码裁剪Strip Engine Code发布Unity项目时,需要注意代码裁剪的问题,Unity只能正确处理Apk包内的代码裁剪,像assetbundle资源上的代码就没办法正确裁剪,最终可能导致裁剪掉有用的代码而报错。
How to stop automatic assembly compilation from script
UIParticleSystem
Particle Effect For UGUI
Automatic Setup of a Humanoid
Mecanim Humanoids
Unity Blogs
Running multiple instances of Unity referencing the same project
Pathfinding in Games
NavMeshComponents
TreeViewExamples
unity editor
UnityDecompiled
PreviewRenderUtility
Working with custom ObjectPreviews and SkinnedMeshRenderers in Unity
Spruce up your custom Unity inspectors with a preview area!
create a preview window using previewrendertutility
Is it possible to create a custom model preview in an Editor window akin to the one displayed when an FBX is selected?
EditorWindow - Preview of prefab
How to correctly draw preview in EditorWindow
Unity 粒子特效预览工具
这个家伙有点牛逼
Introduction to Scriptable Objects
Creating Basic Editor Tools
Property Drawers and Custom Inspectors
Creating Custom Gizmos for Development
Editor Scripting
TextEmoji
Unity3D Book Page Curl
Dynamic Panels for Unity 3D
GText
CruddyEditor
UnityBugTracker
ZZUnityEditor
Unity Editor Tools
ToDo
UnityEditorMemo
BECOME A GAME PERFORMANCE EXPERT
Unity合集:非常丰富;
Awesome Unity Open Source on GitHub (800+):一大包Unity技术合集,力荐;
Animation Texture Baker for Unity:动画烘焙成贴图;
Unity Tutorials: How To Create Custom Editor Window:Create Custom Editor Window;
Unity Editor Built-in Icons:Unity version: 2020.1.0f1 Icons what can load using EditorGUIUtility.IconContent;
Universal Render Pipeline:URP;
Intro to Shader Graph:This post is a detailed introduction to using Shader Graph ;
Writing Shader Code for the Universal RP:Writing Shader Code for the Universal RP;
Universal Rendering Examples:This project contains a collection of Custom Renderer examples. This will be updated as we refine the feature and add more options;
The Big Shader Graph Tutorial: Introduction:This is the first part of a fundamental tutorial about shader graph;
URP - Sampling Shadow Map from Shader Graph:URP - Sampling Shadow Map from Shader Graph;
Introduction To Unity: Particle Systems:Unity’s particle system is both robust and feature packed. In this tutorial, you’ll learn the ins-and-outs of it to create both fire and explosions;
Using MaterialPropertyBlocks with ShaderGraph shaders:Using MaterialPropertyBlocks with ShaderGraph shaders;
How to Use Terrain with URP in Unity 2020 | Beginner Tutorial:How to Use Terrain with URP in Unity 2020 | Beginner Tutorial;
Bake static light and shadows directly into texture ! optimizing for mobile:Bake static light and shadows directly into texture ! optimizing for mobile;
Project Acoustics Unity Bake Tutorial:his article describes acoustics baking by using Project Acoustics in Unity;
How to customize Unity script templates:When I create a new script, the Unity Editor generates its content. For C# scripts it uses the file name as the class name;
Unity Tools - Script Template:This tool adds custom Script Templates to Unity that will serve as alternatives for the default “C#Script” that I personally always modify before writing my scripts;
Editor Window:Create a basic EditorWindow;
Unity – Creating a custom map editor:make a custom map editor in Unity;
unity编辑器扩展之SceneUI:unity编辑器扩展之SceneUI——贴在Scene View的SceneCanvas;
Code Generation in Unity
Compile C# at runtime in Unity3D
Creating a Node Based Editor in Unity
package-reference:Unity Package
Unity download archive:Unity内置shader源码下载
OpenWorldFramework
Long-Term-Open-World
Procedural-Content-Generation
Filter which objects I can select in the scene object via editor tool
Game Architecture with Scriptable Objects

Duality

Getting Started:It’s an extensible 2D game engine;
Turn-based game framework in Duality (C#):This post presents a simple turn-based game framework using the Duality game engine;

Other

Tutorial

GPU Gems 3:英伟达提供的CG渲染书集资料
【游戏开发进阶】教你Unity通过Jenkins实现自动化打包,打包这种事情就交给策划了(保姆级教程 | 命令行打包 | 自动构建)
【游戏开发进阶】教你自制离线Maven仓库,实现Unity离线环境使用Gradle打包(Unity | Android | 谷歌 | Gradle)
GameDev Academy
C++, OpenGL and more…:…;
GAME DEVELOPMENT TUTORIALS:Read our free tutorials on game development submitted by our staff and expert users in our community;
Performance optimization tips: Physics in Unity | Tutorial:…;
【Docker闪退】【解决方法】It looks like there is an error with Docker Desktop, restart it to fix it

ECS

entity-component-system:A simple and easy to use entity-component-system C++ library;

Library

Clipper - an open source freeware library:The Clipper library performs line & polygon clipping - intersection, union, difference & exclusive-or,and line & polygon offsetting. The library is based on Vatti’s clipping algorithm;
The Unity Library:The Unity Library;
HoudiniEngineForUnity
Houdini Engine for Unity

Papers

10 Best Turn-Based Strategy Games in 2021 for Master Tacticians:10 Best Turn-Based Strategy Games in 2021 for Master Tacticians;
壹种念头Unity blog
收录些关于渲染相关的文章
What is Houdini?

Bing Map

MVP - Bing Maps : une année supplémentaire !
Geocoding and Routing improvements added to Bing Maps

CG Tutorial

redshift3d
cgwiki
houdini
cargo
Authoring Particle Systems in Unity through Houdini
BASICS OF GEOMETRY NODES
Houdini Guide
Houdini Resources
HOUDINI DOCUMENTATION
houdini docs
HOUDINI TUTORIAL
Houdini Tech Blog
Houdini Render Passes
Houdini - Unity - Rigid Body Fracturing Pipeline
Best Houdini Tutorials For Learning VFX & Animation (Free + Premium)
Houdini Engine for Unity
Creating a bones in Houdini
A Houdini Blog
Houdini Python
How To Reuse Python Code In A Houdini Scene
Nodes, Networks and Digital Assets
有关All In One 的houdini实现道路
VEX tutorial

App

胡迪尼 SideFX Houdini FX v19.0.383 破解版:亲测有效
SideFX Houdini FX19【3D特效制作工具】免费破解版下载:这个我并没有测试过
7-Zip一个非常好用的压缩软件
hfs
Ghostwriter采用MarkDown语言的免费文本编辑工具,可以实时预览编辑效果。
Dillinger采用MarkDown语言的在线文本编辑工具,可以实时预览编辑效果。
MathJax Online Editor线上编辑数学公式。例:$$x = {-b \pm \sqrt{b^2-4ac} \over 2a}.$$
mathjax数学公式编辑软件。
Install-FFmpeg-on-Windows:ffmpeg官网好像进不了,不过这个网站的下载链接可以直接链接到官网地址,进行直接下载。
下载Java 11 下载路径

Assets

free 3d models
mixamo动作资源库
AIM@SHAPE
opengameart
Create, upload, and share Houdini Digital Assets
scanslibrary
Texture Synthesis Houdini
turbosquid
vfxcamp
3DS Max/Blender/Houdini/Modo/Maya三角面转四边形网格重拓扑插件Exoside QuadRemesher v1.01
SideFX“实验室”SideFX Labs没看
Exoside_QuadRemesher 四边化插件插件下载
QuadRemesh为houdini付费
Quad Remesher is available as plugins for四边化插件官网,Houdini里面其实也是用他们家的

线段相交

对于平面上给定的两个线段line0、line1,求解其交点

1
2
3
4
5
6
7
8
9
10
11
12
13
14
15
public static bool LinesIntersect(Vector2 line0_start, Vector2 line0_end, Vector2 line1_start, Vector2 line1_end, out float line0_cross_line1, out float along_line0, out along_line1, out Vector2 intersect_point)
{
var dir_line0 = line0_end - line0_start;
var dir_line1 = line1_end - line1_start;
line0_cross_line1 = dir_line0.x * dir_line1.y - dir_line0.y * dir_line1.x;
along_line0 = 0;
along_line1 = 0;
intersect_point = Vector2.zero;
if(line0_cross_line1 == 0) return false;
var dir_line_start01 = line0_start - line1_start;
along_line0 = (dir_line1.x * dir_line_start01.y - dir_line1.y * dir_line_start01.x) / line0_cross_line1;
along_line1 = (dir_line0.x * dir_line_start01.y - dir_line0.y * dir_line_start01.x) / line0_cross_line1;
// if (along_line0 < 0 || along_line0 > 1 || along_line1 < 0 || along_line1 > 1) return false;
return true;
}

相关链接:
Math Open Reference
Polygon Clipping
Barend’s Blog
Concave Polygon Intersection - Algorithm
Euclidean Shortest Paths

1
2
3
4
5
6
7
8
9
10
11
12
13
14
15
16
17
18
19
20
21
22
23
24
25
26
27
28
29
30
31
32
33
34
35
36
37
38
39
40
41
42
43
44
45
46
47
48
49
50
51
52
53
54
55
56
57
58
59
60
61
62
63
64
65
66
67
68
69
70
71
72
73
74
75
76
77
78
79
80
81
82
83
84
85
86
87
88
89
90
91
92
93
94
95
96
97
98
99
100
101
102
103
public WaterFeature :ScriptableRendererFeature
{
[Serializable]
public class Settings
{
public string TextureName = "_NormalGrabTexture";
public LayerMask LayerMask;
public Material normalGrabMaterial;
public int normalGrabMaterialPassIndex = 0;
public LayerMask WaterLayerMask;
}
class NormalGrabPass : ScriptableRenderPass
{
Settings settings;
Material normalGrabMaterial;
int normalGrabMaterialPassIndex = 0;
RenderTargetHandle tempNormalTarget;
List<ShaderTagId> m_ShaderTagIdList = new List<ShaderTagId>();
FilteringSettings m_FilteringSettings;
RenderStateBlock m_RenderStateBlock;
public NormalGrabPass(Settings settings)
{
this.settings = settings;
normalGrabMaterial = new Material(Shader.Find("Unlit/NormalTexture"));
normalGrabMaterialPassIndex = 0;
renderPassEvent = RenderPassEvent.AfterRenderingOpaques;
tempNormalTarget.Init(settings.TextureName);
m_ShaderTagIdList.Add(new ShaderTagId("UniversalForward"));
m_ShaderTagIdList.Add(new ShaderTagId("LightweightForward"));
m_ShaderTagIdList.Add(new ShaderTagId("SPRDefaultUnlit"));
m_FilteringSettings = new FilteringSettings(RenderQueueRange.all, settings.LayerMask);
m_RenderStateBlock = new RenderStateBlock(RenderStateMask.Nothing);
}
public overide void Configure(CommandBuffer cmd, RenderTextureDescriptor cameraTextureDescriptor)
{
cmd.GetTemporaryRT(tempNormalTarget.id, cameraTextureDescriptor);
cmd.SetGlobalTexture(settings.TextureName, tempNormalTarget.Identifier());
ConfigureTarget(tempNormalTarget.Identifier()); //sceen view
cmd.SetRenderTarget(tempNormalTarget.Identifier()); // game view
}
public overrider void Execute(ScriptableRenderContext context, ref RenderingData renderingData)
{
CommandBuffer cmd = CommandBufferPool.Get();
context.ExecuteCommandBuffer(cmd);
cmd.Clear();
Matrix4x4 viewMatrix = renderingData.cameraData.camera.worldToCameraMatrix;
Vector3 normal = viewMatrix.MultiplyVector(new Vector3(0,1,0));
cmd.ClearRenderTarget(false, true, new Color(normal.x, normal.y, normal.z));
context.ExecuteCommandBuffer(cmd);
cmd.Clear();

DrawingSettings drawingSettings = CreateDrawingSettings(m_ShaderTagIdList, ref renderingData, SortingCriteria.CommonOpaque);
drawingSettings.overrideMaterial = normalGrabMaterial;
drawingSettings.overrideMaterialPassIndex = normalGrabMaterialPassIndex;
contex.DrawRenderers(renderingData.cullResults, ref drawingSettings, ref m_FilteringSettings, ref m_RenderStateBlock);

context.ExecuteCommandBuffer(cmd);
CommandBufferPool.Release(cmd);
}
public override void FrameCleanup(CommandBuffer cmd)
{
cmd.ReleaseTemporaryRT(tempNormalTarget.id);
}
}
class WaterPass : ScriptableRenderPass
{
List<ShaderTagId> m_ShaderTagIdList = new List<ShaderTagId>();
RenderStateBlock m_RenderStateBlock;
FilteringSettings m_FilteringSettings;
public WaterPass(Settings settings)
{
renderPassEvent = RenderPassEvent.BeforeRenderingTransparents;
m_ShaderTagIdList.Add(new ShaderTagId("Water"));
m_RenderStateBlock = new RenderStateBlock(RenderStateMask.Nothing);
m_FilteringSettings = new FilteringSettings(RenderQueueRange.transparent, settings.WaterLayerMask);
}
public override void Execute(ScriptableRenderContext context, ref RenderingData renderingData)
{
CommandBuffer cmd = CommandBufferPool.Get();
context.ExecuteCommandBuffer(cmd);
cmd.Clear();

DrawingSettings drawingSettings = CreateDrawingSettings(m_ShaderTagIdList, ref renderingData, SortingCriteria.CommonOpaque);
contex.DrawRenderers(renderingData.cullResults, ref drawingSettings, ref m_FilteringSettings, ref m_RenderStateBlock);

context.ExecuteCommandBuffer(cmd);
CommandBufferPool.Release(cmd);
}
}
[SerializeField] Settings settings = new Settings();
NormalGrabPass normalGrabPass;
WaterPass waterPass;
public override void AddRenderPasses(ScriptableRenderer renderer, ref RenderingData renderingData)
{
renderer.EnqueuePass(normalGrabPass);
renderer.EnqueuePass(waterPass);
}
public override void Create()
{
normalGrabPass = new NormalGrabPass(settings);
waterPass = new WaterPass(settings);
}
}
1
2
3
4
5
6
7
8
9
10
11
12
13
14
15
16
17
18
19
20
21
22
23
24
25
26
27
28
29
30
31
32
33
34
35
36
37
38
39
40
41
42
43
Shader "Unlit/NormalTexture"
{
Properties{}
SubShader
{
Tags {"RenderType" = "Opaque" "RenderPipeline" = "UniversalPipeline"}
ZWrite Off
ZTest Always
Pass
{
Name "NormalTexture"
HLSLPROGRAM
#pragma vertex vert
#pragma fragment frag
#include "Packages/com.unity.render-pipelines.universal/ShaderLibrary/Corel.hlsl"
struct VertexInput
{
float4 posotionCS : POSITION;
float3 normal : NORMAL;
};
struct FragInput
{
float4 positionCS : SV_POSITION;
float3 normal : TEXCOORD0;
};
FragInput vert(VertexInput i)
{
FragInput o;
float3 worldPos = TransformObjectToWorld(i.positionOS.xyz);
float4 clipPos = TransformWorldToHClip(worldPos);
o.positionCS = clipPos;
float3 worldNormal = TransformObjectToWorldNormal(i.normal);
o.normal = TransformWorldToViewDir(worldNormal);
return o;
}
half4 frag(FragInput i) : SV_TARGET
{
return half4(i.normal, 1);
}
ENDHLSL
}
}
}
1
2
3
4
5
6
7
8
9
10
11
12
13
14
15
16
17
18
19
20
21
22
23
24
25
26
27
28
29
30
31
32
33
34
35
36
37
38
39
40
41
42
43
44
45
46
47
48
49
50
51
52
53
54
55
56
57
58
59
60
61
62
63
64
65
66
67
68
69
70
71
72
73
74
75
76
77
78
79
80
81
82
83
84
85
86
87
88
89
90
91
92
93
94
95
96
97
98
99
100
101
102
103
104
105
106
107
108
109
110
111
112
113
114
115
116
Shader "Unlit/ToonWater"
{
Properties
{
_DepthGradientShallow("Depth Gradient Shallow", Color) = (0,3,0.8,0.9,0.4)
_DepthGradientDeep("Depth Gradient Deep", Color) = (0.08, 0.4, 0.1, 0.7)
_DepthMaxDistance("Depth Maximum Distance", Float) = 1

_SurfaceNoise("Surface Noise", 2D) = "white"{}
_SurfaceNoiseCutoff("Surface Noise Cutoff", Range(0,1)) = 0.77
_FoamColor("Foam Color", Color) = (1,1,1,1)
_FoamMaxDistance("Foam Max Distance", Float) = 1
_FoamMinDistance("Foam Min Distance", Float) = 0.4
_SurfaceNoiseScroll("Surface Noise Scroll Amount", Vector) = (0.03, 0.03, 0, 0)
_SurfaceDistortion("Surface Distortion", 2D) = "white"{}
_SurfaceDistortionAmount("Surface Distortion Amount", Range(0,1)) = 0.27
}
SubShader
{
Tags { "RenderType" = "Transparent" "Queue" = "Transparent" "RenderPipeline" = "UniversalPipeline" }
Blend SrcAlpha OneMinusSrcAlpha
ZWrite Off
Pass
{
Tags {"LightMode" = "Water" }
HLSLPROGRAM
#define SMOOTHSTEP_AA 0.01
#pragma vertex vert
#pragma fragment frag
#include "Packages/com.unity.render-pipelines.universal/ShaderLibrary/Core.hlsl"
#include "Packages/com.unity.render-pipelines.universal/ShaderLibrary/DeclareDepthTexture.hlsl"
float4 _DepthGradientShallow;
float4 _DepthGradientDeep;
float _DepthMaxDistance;
TEXTURE2D(_SurfaceNoise); SAMPLER(sampler_SurfaceNoise);
float4 _SurfaceNoise_ST;
float _SurfaceNoiseCutoff;
float _FoamMaxDistance;
float _FoamMinDistance;
float2 _SurfaceNoiseScroll;
TEXTURE2D(_SurfaceDistortion); SAMPLER(sampler_SurfaceDistortion);
float4 _SurfaceDistortion_ST;
float _SurfaceDistortionAmount;
TEXTURE2D(_NormalGrabTexture); SAMPLER(sampler_NormalGrabTexture);
float4 _FoamColor;
struct VertexInput
{
float4 positionOS : POSITION;
float2 uv : TEXCOORD0;
float3 normal : NORMAL;
};
struct FragInput
{
float4 positionCS : SV_POSITION;
float4 screenPos : TEXCOORD0;
float3 viewPos : TEXCOORD1;
float2 noiseUV : TEXCOORD2;
float2 distortUV : TEXCOORD3;
float3 viewNormal : NORMAL;
};
FragInput vert(VertexInput i)
{
FragInput o;
float3 worldPos = TransformObjectToWorld(i.positionOS.xyz);
float4 clipPos= TransformWorldToHClip(worldPos);
float4 screenPos = ConputeScreenPos(clipPos);
float3 viewPos = TransformWorldToView(worldPos);
o.positionCS = clipPos;
o.screenPos = screenPos;
o.viewPos = viewPos;
o.noiseUV = TRANSFORM_TEX(i.uv, _SurfaceNoise);
o.distortUV = TRANSORM_TEX(i.uv, _SurfaceDistortion);
float3 worldNormal = TransformObjectToWorldNormal(i.normal);
o.viewNormal = TransformWorldToViewDir(worldNormal);
return o;
}
float4 AlpahBelnd(float4 top, float4 bottom)
{
float3 color = top.rgb * top.a + (1 - top.a) * bottom.rgb;
float alpha = top.a + bottom.a * (1 - top.a);
return float4(color, alpha);
}
half4 frag(FragInput i) : SV_TARGET
{
half4 color = float4(1,1,1,1);
float2 screenUV = i.screenPos.xy / i.screenPos.w;
float sceeneRawDepth = SampleSceneDepth(sceenUV);
float sceenEyeDepth = LinearEyeDepth(sceneRawDepth, _ZBufferParams);
float depthDifference = sceneEyeDepth - i.scenePos.w;

float waterDephtDifference01 = saturate(depthDifference / _DepthMaxDistance);
float4 waterColor = lerp(_DepthGradientShallow, _DepthGradientDeep, waterDepthDifference01);

float2 distortSample = SAMPLE_TEXTURE2D(_SurfaceDistortion, sampler_SurfaceDistortion, i.distorUV).xy;
distortSample = (distortSample * 2 - 1) * _SurfaceDIstortionAmount;

float noiseUV = float2(i.noiseUV.x + _Time.y * _SurfaceNoiseScroll.x,
i.noiseUV.y + _Time.y * _SurfaceNoiseScroll.y);
float surfaceNoiseSample = SAMPLE_TEXTURE2D(_SurfaceNoise, sampler_SurfaceNoise, noiseUV);

float3 existingNormal = SAMPLE_TEXTURE2D(_NormalGrabTexture, sampler_NormalGrabTexture, screenUV).rgb;
float normalDot = saturate(do(existingNormal, i.viewNormal));
float foamDistance = lerp(_FoamMaxDistance, _FoamMinDistance, normalDot);
float foamDipthDifference01 = saturate(depthDifference / foamDistance);

float surfaceNoiseCutoff = foamDepthDifference01 * _surfaceNoiseCutoff;
float surfaceNoise = smoothstep(surfaceNoiseCutoff - SMOOTHSTEP_AA, surfaceNoiseCutoff + SMOOTHSTEP_AA, surfaceNoiseSample);

float4 surfaceNoiseColor = _FoamColor * surfaceNoise;
color = ALphaBlend(surfaceNoiseColor, waterColor);
return color;
}
ENDHLSL
}
}
}

获取当前选择的目录

1
2
3
4
5
6
7
8
9
10
11
12
13
14
15
16
public static string GetCurrentAssetDirectory()
{
foreach(var obj in Selection.GetFiltered<Object>(SelectionMode.Assets))
{
var path = AssetDataBase.GetAssetPath(obj);
if(string.IsNullOrEmpty(path))
{
return path;
}
else if(System.IO.File.Exists(path))
{
return System.IO.Path.GetDirectory(path);
}
}
return "Assets";
}

创建hlsl脚本

1
2
3
4
5
6
7
8
9
10
11
12
13
14
15
16
17
public static class AssetsMenu
{
[MenuItem("Assets/Create HLSL")]
public static void CreateHLSL()
{
//string projectPath = Path.GetDirectoryName(Application.dataPath);

string assetPath = Path.Combine(GetCurrentAssetDirectory(), "temp.hlsl");
assetPath = AssetDataBase.generateuniqueAssetPath(assetPath);

AssetDataBase.CreateAsset(new TextAsset("--", assetPath);
File.WriteAllText(assetPath, ""); // clean

AssetDataBase.SaveAssets();
AssetDataBase.Refresh();
}
}

EmmyLua是Jetbrains IDE的一个插件,它提供了一套注解的语法,可以帮助IDE进行代码之间索引跳转,以及变量名称提示等功能。总而言之,EmmyLua是丰富IDE的功能,和实际的代码没有关系,IDE的跳转也只是限于注释之间。

类的声明

EmmyLua使用@class来模拟面向对象编程,支持继承和属性

1
2
3
4
5
6
7
8
9
--- my supper class
---@class Transport
local p = Class()

--- 子类
---@class Car : Transport
local cls = Class(p)
function c:test()
end

其格式如下:

1
--@class my_type[: parent_type] [@comment]

举个例子:

1
2
3
4
---@class Car : Transport @define class Car extends Transport
local cls = class()
function clas:test()
end

上面定义了一个Car类,我们可以使用@type Car来表明某个变量属于Car类

变量的声明

使用@type可以指明某个变量的类型

1
2
3
4
5
---@type Car
local car1 = getCar()
---@type Car
global_car = getCar()
global_car:test()

其格式如下:

1
---@type my_type[|other_type] [@comment]

举个例子:

1
2
3
4
5
6
7
8
9
10
11
12
13
---@type Car @instance of car
local car1 = {}

---@type Car|Ship @transport tools, car or ship. Since lua is dynamic-typed, a variable may be of different types
---use | to list all possible types
local transport = {}

---@type Car @global variable type
global_car = {}

local obj = {}
---@type Car @property type
obj.car = getCar()

别名注释

使用@alias将一些复杂不容易输入的类型注册为新的容易输入的类型
其格式如下:

1
---@alias new_name type

举个例子:

1
2
3
4
---@alias Handler fun( type: string, data: any):void
---@param handler Handler
function addHandler(handler)
end

参数说明

使用@param来指定函数的参数类型
其格式如下:

1
---@param param_name my_type[|other_type] [@comment]

举个例子:

1
2
3
4
5
6
7
8
9
10
11
---@param car Car
local function setCar(car)
end

---@param car Car
setCallback(function(car)
end)

---@param car Car
for k, car in pairs(list) do
end

函数返回值类型说明

其格式如下:

1
---@return my_type[|other_type] [@comment]

举个例子:

1
2
3
4
5
6
7
8
9
10
---@return Car|Ship
local function crate()
end

---here car_or_ship doesn't need @type annotation, EmmyLua has already inferred the type via "create" function
local car_or_ship = create()

---@return Car
function factory:create()
end

属性声明

使用@field可以标明类所具有的属性,即使类中没有使用到这个属性
其格式如下:

1
---@field [public|protected|private] field_name field_type[|other_type] [@comment]

举个例子:

1
2
3
---@class Car
---@field public name string @add name field to class Car, you'll see it in code completion
local cls = class()

泛型声明

使用@generic来模拟一些高级语言的泛型
其格式如下:

1
---@generic T1 [: parent_type] [, T2 [: parent_type]]

举个例子:

1
2
3
4
5
6
7
8
9
10
11
---@generic T : Transport, K
---@param param1 T
---@param param2 K
---@return T
local function test(param1, param2)
-- todo
end

---@type Car
local car = ...
local value = test(car)

这里说明一下,上面的TK都是类型,只不过T是继承自Transport的一种类型,而K可以是任何类型。
然后param1是类型T的实例

不定参数的注释

使用@vararg注解函数不定参数部分
其格式如下:

1
---@vararg type

举个例子:

1
2
3
4
5
---@vararg string
---@return string
local function format(...)
local tbl = {...} --inferred as string[]
end

嵌入其他语言

使用@language可以在lua代码中嵌入其他语言
其格式如下:

1
---@language language_id

举个例子:

1
2
3
4
---@language JSON
local jsonText = [[{
"name":"Emmy"
}]]

数组类型声明

使用@type mytype[]可以指定变量类型为数组
其格式如下:

1
---@type my_type[]

举个例子:

1
2
3
4
5
6
7
8
---@type Car[]
local list = {}
local car = list[1]
-- car, and you 'll see completion

for i, car in pairs(list) do
-- car. and you'll see completion
end

table类型声明

使用@type table可以表示某变量为表格类型
其格式如下:

1
---@type table<key_type, value_type>

举个例子:

1
2
3
4
5
6
7
---@type table<string, Car>
local dict = {}
local car = dict['key']
-- car. and you'll see completion
for key, car in pairs(dict) do
-- car. and you'll see completion
end

函数声明

使用fun(param:my_type):return_type来表示函数类型变量
其格式如下:

1
---@type fun(param:my_type):return_type

举个例子:

1
2
3
4
5
6
7
8
9
10
11
12
@type fun(key:string):Car
local carCreatorFn1

local car = carCreatorFn1('key')
-- car. and you see code completion

---@type fun():Car[]
local carCreatorFn2

for i, car in pairs(carCreatorFn2()) do
-- car. and you see completion
end

字面常量类型声明

字面常量也可以指定特定字符串来作为代码提示,结合别名,可以起到类似于枚举的效果
举个例子:

1
2
3
4
5
6
---@alias Handler fun(type: string, data: any): void

---@param event string | "'onClised'" | "'onData'"
---@param handler Handler | "function(type, data) print(data) end"
function addEventListener(event, handler)
end

上面的写法还是比较复杂,我们可以用@alias再简化一下

1
2
3
4
5
6
---@alias Handler fun(type: string, data: any): void
---@alias IOEventEnum string | "'onClised'" | "'onData'"
---@param event IOEventEnum
---@param handler Handler | "function(type, data) print(data) end"
function addEventListener(event, handler)
end

自己做了个飞行模拟的小游戏,发布到手机上需要用到摇杆来控制。原先是通过一个Joystick类来实现,摇杆位置固定,详细请参考这里
但是后面策划说要做成王者荣耀那种,摇杆的位置会根据手指的位置有一定的活动区域,所以我重新写了一份逻辑,并且对代码进行一定的逻辑细分,效果如下:
wwwwwww

首先,我这里将摇杆分为几个部分:

  • 摇杆可触发区域,紫色区域,当手指放在该区域时,可以操控摇杆
  • 摇杆中心位置可活动区域,黄色区域,绿色的圆形摇杆背景图的中心点可到达的区域
  • 最后是白色的摇杆和绿色摇杆背景的组合

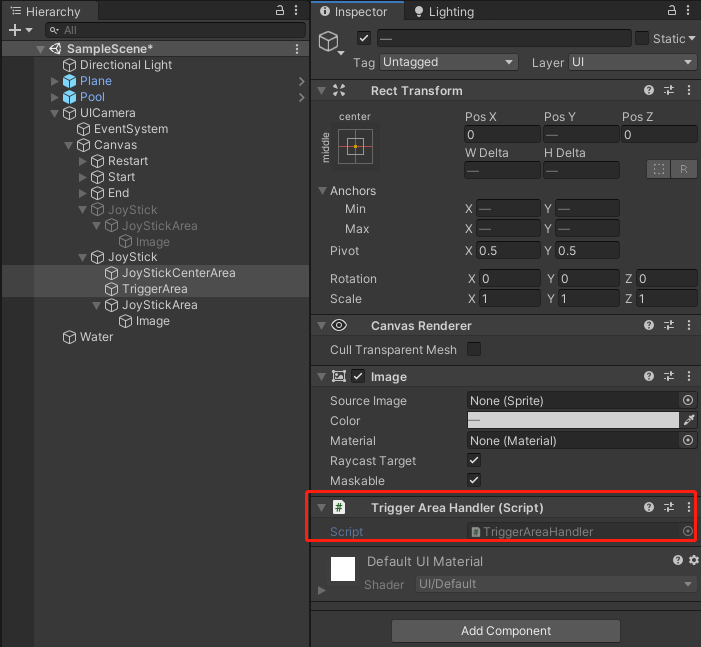
前两个都挂载了一个区域判断的类-TriggerAreaHandler,主要用来判断屏幕点是否在该区域内,如图所示:
wwwwwww
详细代码如下:

1
2
3
4
5
6
7
8
9
10
11
12
13
14
15
16
17
18
19
20
21
22
23
24
25
26
27
28
29
30
31
32
33
34
35
36
37
38
39
40
41
42
43
44
45
46
47
48
49
50
51
52
53
54
55
56
57
58
59
60
61
62
63
64
65
66
67
68
69
70
71
72
73
74
75
76
77
78
79
using System.Collections;
using System.Collections.Generic;
using UnityEngine;
/// <summary>
/// 用于UI区域判定
/// </summary>
public class TriggerAreaHandler : MonoBehaviour
{
RectTransform[] _triggerArea = null;//触发区域
Camera _camera = null;//画布摄像机
Canvas _canvas = null;//画布
void InitTriggerArea()
{//初始化区域
if (_triggerArea != null) return;
_triggerArea = GetComponentsInChildren<RectTransform>();
_canvas = GetComponentInParent<Canvas>();
_camera = _canvas.worldCamera;
}
/// <summary>
/// 计算屏幕区域是否在当前区域内
/// </summary>
/// <param name="screenPos">屏幕坐标</param>
/// <returns></returns>
public bool CheckScreenPosInArea(Vector2 screenPos)
{
InitTriggerArea();
for (int i=0;i< _triggerArea.Length;++i)
{
if (RectTransformUtility.RectangleContainsScreenPoint(_triggerArea[i], screenPos, _camera))
return true;
}
return false;
}
/// <summary>
/// 将屏幕点夹紧到该区域
/// </summary>
/// <param name="screenPos"></param>
/// <returns></returns>
public Vector2 Clamp(Vector2 screenPos)
{
InitTriggerArea();
Vector2 clampPos = _camera.WorldToScreenPoint(_triggerArea[0].position);
float len = float.MaxValue;
InitTriggerArea();
for (int i = 0; i < _triggerArea.Length; ++i)
{
RectTransform rectTransform = _triggerArea[i];
if (RectTransformUtility.RectangleContainsScreenPoint(_triggerArea[i], screenPos, _camera))
{
return screenPos;
}
else
{

Vector2 rectPos = _camera.WorldToScreenPoint(rectTransform.position);
Rect rect = RectTransformUtility.PixelAdjustRect(rectTransform, _canvas);
Vector2 clampPos_temp = Clamp(screenPos, rectPos, new Vector2(rect.width/2, rect.height/2));
float distance = (clampPos_temp - screenPos).sqrMagnitude;
if (distance < len)
{
len = distance;
clampPos = clampPos_temp;
}
}
}
return clampPos;
}
Vector2 Clamp(Vector2 value,Vector2 center, Vector2 halfSize)
{
return new Vector2(Clamp(value.x, center.x - halfSize.x, center.x + halfSize.x),
Clamp(value.y, center.y - halfSize.y, center.y + halfSize.y));
}
float Clamp(float value, float min, float max)
{
value = value > min ? value : min;
value = value < max ? value : max;
return value;
}
}

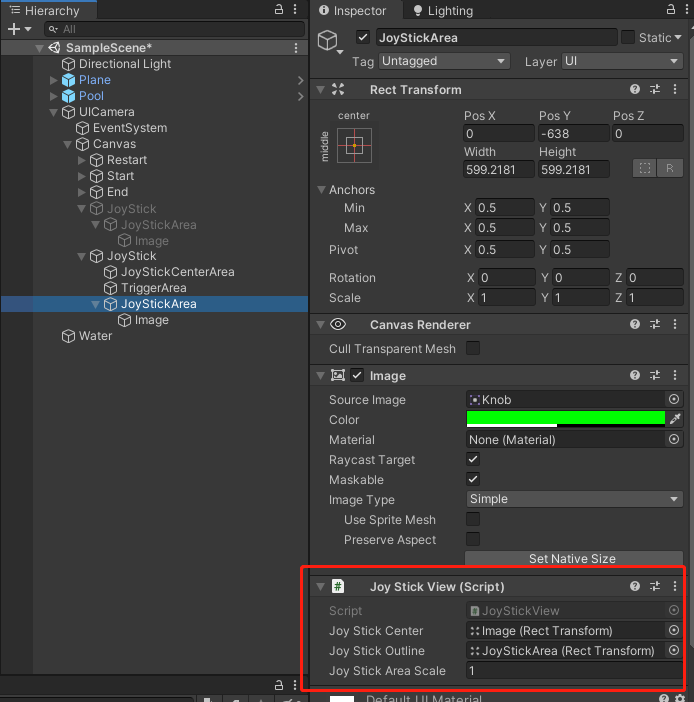
第三部分的摇杆组合,主要是用来显示的,所以下面挂载了一个控制其显示的脚本-JoyStickView,该脚本控制摇杆组合的位置显示,如图所示:
wwwwwww
代码如下:

1
2
3
4
5
6
7
8
9
10
11
12
13
14
15
16
17
18
19
20
21
22
23
24
25
26
27
28
29
30
31
32
33
34
35
36
37
38
39
40
41
42
43
44
45
46
47
48
49
50
51
52
53
54
55
56
57
58
59
60
61
62
63
64
65
66
67
68
69
70
71
72
73
74
75
76
77
78
79
80
using System.Collections;
using System.Collections.Generic;
using UnityEngine;
/// <summary>
/// 控制摇杆显示
/// </summary>
public class JoyStickView : MonoBehaviour
{
[SerializeField] RectTransform _joyStickCenter;//摇杆的端点
[SerializeField] RectTransform _joyStickOutline;//摇杆端点区域背景,设置为摇杆端点的父节点
[SerializeField] float _joyStickAreaScale = 1;//在背景区域的基础上进行缩放,得到一个活动区域

bool _initSize = false;
Canvas _canvas = null;
Vector3 _joyStickOriginScreenPos0 = Vector3.zero; //摇杆初始原点
Vector3 _joyStickOriginScreenPos = Vector3.zero; //摇杆原点
float _joyStickRadius = 0;//摇杆真实的屏幕活动半径
/// <summary>
/// 获取摇杆屏幕活动半径
/// </summary>
/// <returns></returns>
public float GetJoyStickRadius()
{
return _joyStickRadius;
}
/// <summary>
/// 计算背景区域的屏幕尺寸
/// 在所有函数之前调用
/// </summary>
public void CalculateAreaSize()
{
if (_initSize) return;
_initSize = true;
if(_canvas==null) _canvas = GetComponentInParent<Canvas>();
_joyStickOriginScreenPos0 = _canvas.worldCamera.WorldToScreenPoint(_joyStickOutline.position);
_joyStickOriginScreenPos = _joyStickOriginScreenPos0;
SetJoyStickOriginPos(_joyStickOriginScreenPos0);
Rect rect = RectTransformUtility.PixelAdjustRect(_joyStickOutline, _canvas);
_joyStickRadius = _joyStickAreaScale * rect.width / 2;
}
/// <summary>
/// 重置摇杆原点为初始原点
/// </summary>
/// <returns>摇杆中心点在屏幕上的位置</returns>
public Vector2 ResetJoyStickOrigionPos()
{
SetJoyStickOriginPos(_joyStickOriginScreenPos0);
return _joyStickOriginScreenPos0;
}
/// <summary>
/// 设置整个摇杆的位置
/// </summary>
/// <param name="screenPos">屏幕坐标</param>
public void SetJoyStickOriginPos(Vector3 screenPos)
{
_joyStickOriginScreenPos.x = screenPos.x;
_joyStickOriginScreenPos.y = screenPos.y;
_joyStickOutline.position = _canvas.worldCamera.ScreenToWorldPoint(_joyStickOriginScreenPos);
}
/// <summary>
/// 基于偏移向量,设置摇杆显示位置
/// </summary>
/// <param name="dir">移动向量</param>
public void SetJoyStick(Vector2 dir)
{
Vector3 dir3 = dir.sqrMagnitude > 1 ? dir.normalized : dir;
Vector3 joyStickScreenPos = dir3 * _joyStickRadius + _joyStickOriginScreenPos;
_joyStickCenter.position = _canvas.worldCamera.ScreenToWorldPoint(joyStickScreenPos);
}
/// <summary>
/// 判断屏幕坐标是否在摇杆触发区域里
/// </summary>
/// <param name="screenPos">屏幕坐标</param>
/// <returns></returns>
public bool InJoyStickArea(Vector2 screenPos)
{
float len = Vector2.Distance(screenPos, _joyStickOriginScreenPos);
return len < _joyStickRadius;
}
}

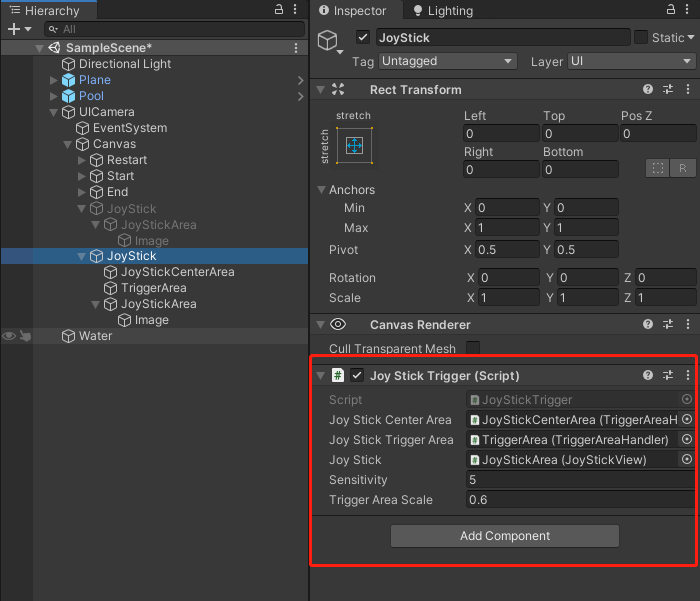
最后是整个摇杆逻辑实现部分-JoyStickTrigger,这个类里面记录了触发事件,以及对外的参数,如图所示:

同样的,通过属性器可以获取当前摇杆的状态参数,包括偏移方向以及强度,方向是360度,强度是[0-1]。详细代码如下:

1
2
3
4
5
6
7
8
9
10
11
12
13
14
15
16
17
18
19
20
21
22
23
24
25
26
27
28
29
30
31
32
33
34
35
36
37
38
39
40
41
42
43
44
45
46
47
48
49
50
51
52
53
54
55
56
57
58
59
60
61
62
63
64
65
66
67
68
69
70
71
72
73
74
75
76
77
78
79
80
81
82
83
84
85
86
87
using UnityEngine;
using UnityEngine.EventSystems;
/// <summary>
/// 摇杆控制模块
/// </summary>
public class JoyStickTrigger : MonoBehaviour, IPointerDownHandler, IPointerUpHandler, IDragHandler
{
public static JoyStickTrigger instance;
[SerializeField] TriggerAreaHandler _joyStickCenterArea;//摇杆背景中心点活动区域
[SerializeField] TriggerAreaHandler _joyStickTriggerArea;//可激活摇杆的区域
[SerializeField] JoyStickView _joyStick;//摇杆
[SerializeField] float _sensitivity = 1;//摇杆灵敏度
[SerializeField] float _triggerAreaScale = 1;//摇杆控制区域
/// <summary>
/// 摇杆偏移方向
/// </summary>
public Vector2 MoveDir { get; private set; }
/// <summary>
/// 摇杆偏移长度[0-1]
/// </summary>
public float MoveLen { get; private set; }
/// <summary>
/// 是否在操控摇杆
/// </summary>
public bool IsDraging { get { return _onJoyStickActive; } }
/// <summary>
/// 摇杆横向偏移量
/// </summary>
public float Horizontal { get { return MoveDir.x * MoveLen; } }
/// <summary>
/// 摇杆纵向偏移量
/// </summary>
public float Vertical { get { return MoveDir.y * MoveLen; } }

Vector2 _originScreenPos = Vector2.zero;//激活摇杆的手指点击位置
Vector2 _dragScreenPos = Vector2.zero;//实时拖动手指位置
Vector2 _interpolateScreenPos = Vector2.zero;//实时摇杆位置
bool _onJoyStickActive = false;//摇杆是否激活
void Awake()
{
instance = this;
}
void OnEnable()
{
_joyStick.CalculateAreaSize();
}
void OnDisable()
{
OnPointerUp(null);
}

public void OnPointerDown(PointerEventData eventData)
{
if (!_joyStickTriggerArea.CheckScreenPosInArea(eventData.position))
return;
_onJoyStickActive = true;
//_originScreenPos = eventData.position;
_originScreenPos = _joyStickCenterArea.Clamp(eventData.position);
_interpolateScreenPos = _dragScreenPos = eventData.position;
_joyStick.SetJoyStickOriginPos(_originScreenPos);
}
public void OnDrag(PointerEventData eventData)
{
if (!_onJoyStickActive) return;
_dragScreenPos = eventData.position;
}

public void OnPointerUp(PointerEventData eventData)
{
_onJoyStickActive = false;
_dragScreenPos = _joyStick.ResetJoyStickOrigionPos();//手指位置归于原点
//_interpolateScreenPos += _dragScreenPos - _originScreenPos;//将插值点随摇杆位置一起归位
_interpolateScreenPos = _dragScreenPos;//
_originScreenPos = _dragScreenPos;//
}

private void Update()
{
_interpolateScreenPos = Vector2.Lerp(_interpolateScreenPos, _dragScreenPos, Time.deltaTime * _sensitivity);
Vector2 dir = _interpolateScreenPos - _originScreenPos;
dir /= _joyStick.GetJoyStickRadius();
dir = dir.sqrMagnitude > 1 ? dir.normalized : dir;
MoveDir = dir;
MoveLen = dir.magnitude;
_joyStick.SetJoyStick(dir);
}
}

wwwwwww
自己做了个飞行模拟的小游戏,发布到手机上需要用到摇杆来控制,所以自己写了一个Joystick类,代码如下:

1
2
3
4
5
6
7
8
9
10
11
12
13
14
15
16
17
18
19
20
21
22
23
24
25
26
27
28
29
30
31
32
33
34
35
36
37
38
39
40
41
42
43
44
45
46
47
48
49
50
51
52
53
54
55
56
57
58
59
60
61
62
63
64
65
66
67
68
69
70
71
72
73
74
75
76
77
78
79
80
81
82
83
84
85
86
87
88
89
90
91
92
93
94
95
96
97
98
99
100
101
102
103
104
105
106
107
108
109
110
111
112
113
114
115
116
117
118
119
120
121
122
using UnityEngine;
using UnityEngine.EventSystems;
using System;

/// <summary>
/// UGUI游戏摇杆
/// </summary>
public class Joystick : MonoBehaviour, IPointerDownHandler, IPointerUpHandler, IDragHandler
{
public static Joystick instance;
[SerializeField] Camera uiCamera;//摇杆对应的ui摄像机
[SerializeField] RectTransform _triggerArea;//触发启动摇杆区域
[SerializeField] RectTransform _joyStickArea;//摇杆活动区域
[SerializeField] RectTransform centerTrans;//摇杆图标
[SerializeField] float sensitivity = 1;//摇杆灵敏度
[SerializeField] float triggerAreaScale = 1;//摇杆控制区域
/// <summary>
/// 摇杆偏移方向
/// </summary>
public Vector2 moveDir { get; private set; }
/// <summary>
/// 摇杆偏移长度[0-1]
/// </summary>
public float moveLen { get; private set; }
/// <summary>
/// 是否在操控摇杆
/// </summary>
public bool isDraging { get; private set; }
/// <summary>
/// 摇杆横向偏移量
/// </summary>
public float Horizontal { get { return moveDir.x * moveLen; } }
/// <summary>
/// 摇杆纵向偏移量
/// </summary>
public float Vertical { get { return moveDir.y * moveLen; } }

Canvas _canvas;
Canvas canvas { get { if (_canvas == null) _canvas = transform.GetComponentInParent<Canvas>(); return _canvas; } }
Vector3 targetScreenPointPos = Vector3.zero;


float radius = 0f;
Vector3 centerScreenPos;
float depth { get { return centerScreenPos.z; } }
bool hasInit = false;

public Action onJoyStickPointerUp;
private void Start()
{
instance = this;

}
void OnEnable()
{
InitParam();
}
void OnDisable()
{
isDraging = false;
targetScreenPointPos = centerScreenPos;
centerTrans.localPosition = Vector3.zero;
}
void InitParam()
{
if (hasInit) return;
hasInit = true;
centerScreenPos = uiCamera.WorldToScreenPoint(_joyStickArea.position);
Rect rect = RectTransformUtility.PixelAdjustRect(_joyStickArea, canvas);
radius = triggerAreaScale * rect.width/2;
targetScreenPointPos = centerScreenPos;
}
public void OnPointerDown(PointerEventData eventData)
{
InitParam();
Vector2 pointScreenPos = eventData.position;
//if (Vector2.Distance(pointScreenPos, centerScreenPos) > radius) return;

isDraging = true;


//targetScreenPointPos = uiCamera.WorldToScreenPoint(eventData.pointerCurrentRaycast.worldPosition);

}
public void OnDrag(PointerEventData eventData)
{
if (!isDraging) return;
Vector3 pointScreenPos = eventData.position;
pointScreenPos.z = depth;
Vector3 dir = pointScreenPos - centerScreenPos;
float len = dir.magnitude;
len = len > radius ? radius : len;
dir = len * dir.normalized;
targetScreenPointPos = centerScreenPos + dir;
}

public void OnPointerUp(PointerEventData eventData)
{
isDraging = false;
targetScreenPointPos = centerScreenPos;
onJoyStickPointerUp?.Invoke();
}

private void Update()
{
Vector3 screenPointPos = uiCamera.WorldToScreenPoint(centerTrans.position);
if(Vector3.Distance(screenPointPos, targetScreenPointPos)<4)
{
screenPointPos = targetScreenPointPos;
}
else
{
screenPointPos = Vector3.Lerp(screenPointPos, targetScreenPointPos, sensitivity * Time.deltaTime);
}

centerTrans.position = uiCamera.ScreenToWorldPoint(screenPointPos);
moveDir = screenPointPos - centerScreenPos;
moveDir /= radius;
moveLen = moveDir.magnitude;
moveLen = moveLen > 1 ? 1 : moveLen;
}
}

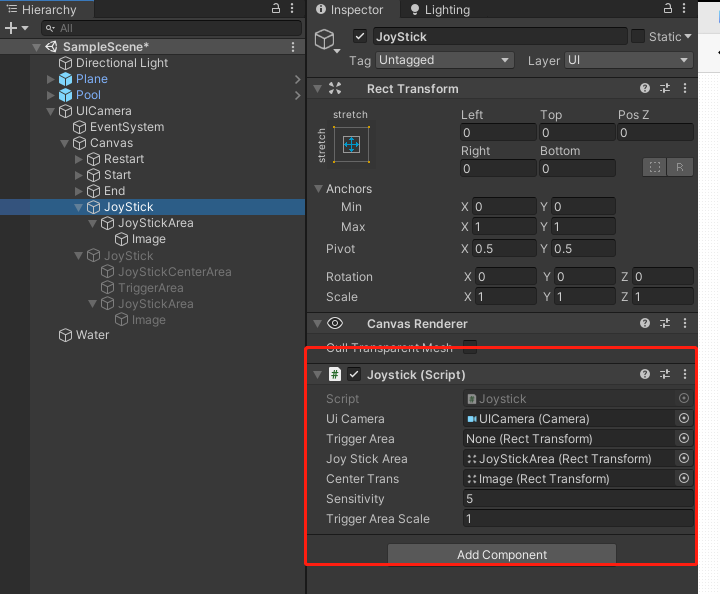
通过属性器可以获取当前摇杆的状态参数,包括偏移方向以及强度,方向是360度,强度是[0-1]。还有几个SerializeField面板设置参数,结构如下图:

通常每个需要渲染的物体都自带材质以及相应的shader,但是有时候我们可能希望使用同一个Shader对场景中的进行渲染。例如,当我们对屏幕图像进行边缘检测时,需要知道每个像素点所对应三维空间点的法向量,然后根据法向量的差异来判断是否是边缘。还有一些情况我们需要场景的深度信息。无论是法向纹理还是深度散纹理等,都可以通过Relpace Shader来实现。
Replace Shader和普通shader没什么区别,我们只需要调用Camera.RenderWithShader或者Camera.SetReplacementShader函数,并指定需要用于替换的shader,以及shader的Tags值。
假如我们有以下三个shader,其中shaderA被设置为Relace Shader,且repalcementTag为”ReplacementTag”,其余两个都是挂载在模型上的shader:

1
2
3
4
5
6
7
8
9
10
11
12
13
14
Shader "Shader A"
{
...
SubShader
{
Tags {"ReplacementTag"="true"}
...
}
SubShader
{
Tags {"OtherTag"="whatever"}
...
}
}
1
2
3
4
5
6
7
8
9
10
11
12
13
14
Shader "Shader B"
{
...
SubShader
{
Tags {"ReplacementTag"="false"}
...
}
SubShader
{
Tags {"OtherTag"="whatever"}
...
}
}
1
2
3
4
5
6
7
8
9
10
11
12
13
14
Shader "Shader C"
{
...
SubShader
{
Tags {"ReplacementTag"="true"}
...
}
SubShader
{
Tags {"OtherTag"="whatever"}
...
}
}

这时候,只有挂载ShaderC的模型会被渲染。虽然ShaderB和ShaderC都含有“ReplacementTag”,但是ShaderA中的"ReplacementTag"="true",只有ShaderC中的第一个SubShader有匹配的Tag值。

Lit Shader replacement

replacement渲染需要指定一个camera来实现,被指定camera的渲染设置都会应用到repalcement渲染过程中,例如render path、light、shadow等。

Built-in scene depth/normals texture

camera本身内置了深度、法向纹理的渲染功能,只需要设置Camera.depthTextureMode,便可以开启这些功能,而渲染后的深度纹理可以用全局的_CameraDepthTexture变量来引用。
而这种内置的渲染功能的实际渲染方法与硬件相关。有些硬件就是通过replacement渲染的方式来实现的。因为ReplacementTag会对实际渲染的物体进行筛选,所以在编写Shader时,要正确使用“RenderType”这个标签。

Code Example

在Start()函数中指定replacement shader:

1
2
3
4
void Start()
{
camera.SetReplacementShader(EffiectShader,"RenderType");
}

EffiectShader需要包含”RenderType”这个标签,如果没有”RenderType”这个,那么不会有任何物体被渲染。另外,EffiectShader可以有多个SubShader,每个SubShader对应一个”RenderType”。例如,我们需要渲染透明物体,可以指定两个SubShader分别渲染”RenderType”=”Transparent”和”RenderType”=”TransparentCutout”。

1
2
3
4
5
6
7
8
9
10
11
12
13
14
15
Shader "EffectShader" {
SubShader {
Tags { "RenderType"="Opaque" }
Pass {
...
}
}
SubShader {
Tags { "RenderType"="SomethingElse" }
Pass {
...
}
}
...
}

SetReplacementShader函数会查找场景中所有物体,这些物体自带的Shader的”RenderType”值和EffectShader中的”RenderType”值匹配的话,那么这些物体将会使用EffectShader中相对应的SubShader进行渲染。

属性Markdown语法要点

本节展示基本的Markdown用法。在Syntax中提供了更为详细的语法介绍。下面通过同时显示了转换前和转换后的例子,展示Markdown语法与HTML格式的对照关系。
同时我们可以使用Dingus在线语法验证工具来更好的理解Markdown语法。

段落、标题、引用

段落由一行或多行连续的文本构成,段落之间通过一行或多行空格分隔。正常的段落不应该使用space或tabs进行缩进。

Markdown提供两种风格的标题格式:Setext和atx:

  • Setext风格是采用下滑线的形式来对标题进行标记。例如一级标题和二级标题,分别使用 = 和 - 来代表;
  • atx风格的标题,采用1-6个置于行首的#号来表示。#号的个数代表标题的等级;

块引用使用的是邮件风格的>号表示。

Markdown:

1
2
3
4
5
6
7
8
9
10
11
12
13
14
一级标题
========
二级标题
--------
然后这里是贝拉巴啦啦吧一堆描述的、正儿八经的段落。
再来一段。

### 三级标题
> 这是块引用
>
> 这是块引用的第二段
> 这是块引用的第三段
>
> ## 这是块引用中的二级标题

HTML:

1
2
3
4
5
6
7
8
9
10
11
<h1>一级标题</h1>
<h2>二级标题</h2>
<p>然后这里是贝拉巴啦啦吧一堆描述的、正儿八经的段落。</p>
<p>再来一段<p>
<h3>三级标题</h3>
<blockquote>
<p>这是块引用</p>
<p>这是块引用的第二段</p>
<p>这是块引用的第三段</p>
<h2>这是块引用中的二级标题</h2>
</blockquote>

短语强调

Markdown使用 * 或 _ 来表示强调范围
Markdown:

1
2
3
4
5
有些*人*就是特殊
有些_事_就是漂亮

还有些**人**特殊到无以复加
还有些__事__漂亮到难以形容

HTML:

1
2
3
4
5
<p>有些<em></em>就是特殊</p>
<p>有些<em></em>就是漂亮</p>

<p>还有些<strong></strong>特殊到无以复加</p>
<p>还有些<strong></strong>漂亮到难以形容</p>

列表

无序号的列表使用 * 和 + 以及 - 号来表示。这三个符号表达的是一个意思;
例如这个:

1
2
3
* Candy
* Gum
* Booze

这个:

1
2
3
+ Candy
+ Gum
+ Booze

还有这个:

1
2
3
- Candy
- Gum
- Booze

这三个输出的结果都是同样的HTML格式:

1
2
3
4
5
<ul>
<li>Candy</li>
<li>Gum</li>
<li>Booze</li>
</ul>

有需要的列表使用的是数字加 . 的方式:

1
2
3
1. Red
2. Green
3. Blue

HTML:

1
2
3
4
5
<ol>
<li>Red</li>
<li>Green</li>
<li>Blue</li>
</ol>

如果列表之间有空行,那么这些列表元素就会被认为是段落。如果单个元素由多个段落构成,那么需要将后续的段落进行缩进处理:

1
2
3
4
5
6
7
8
9
10
1. Red

2. Green
green
3. Blue
blue

4. yellow

5. Orange

HTML:

1
2
3
4
5
6
7
8
9
<ol>
<li><p>Red</p></li>
<li><p>Green
green</p></li>
<li><p>Blue
blue</p></li>
<li><p>yellow</p></li>
<li><p>Orange</p></li>
</ol>

链接

Markdown提供两种链接方式:

  • inline,内联方式;
  • reference,引用方式;

这两种方式都需要使用方括号来分隔需要显示的文本。
内联方式直接在方括号后面使用圆括号来表示链接,例如:

1
这是[链接名称](http://example.com/)。

HTML:

1
<p>这是<a href="http://example.com/">链接名称</a></p>

另外,我们也可以给网址命个名:

1
这是[链接名称](http://example.com/ "黑网")。

HTML:

1
<p>这是<a href="http://example.com/" title="黑网">链接名称</a></p>

引用方式通过给链接命名的方式进行链接:

1
2
3
4
5
我从[黑网][1]跳到[白网][2]再跳到[红网][3]

[1]: http://black-net.com/ "黑网"
[2]: http://white-net.com/ "白网 1"
[3]: http://red-net.com/ "红网 2"

HTML:

1
<p>我从<a href="http://black-net.com/" title="黑网">黑网</a>跳到<a href="http://white-net.com/" title="白网 1">白网</a>再跳到<a href="http://red-net.com/" title="红网 2">红网</a></p>

上面的title属性可有可无。链接名由字母、数字、空格构成,不区分大小写:

1
2
我在[红网a][red 1]看到你的照片
[REd 1]: http://red-a-net.com/

HTML:

1
<p>我在<a href="http://red-a-net.com/">红网a</a>看到你的照片</p>

图片

图片的语法和链接非常相似,也是有Inline和Reference两种方式,如下所示,其中Title属性是可有可无的:

  • Inline,内联方式:
    1
    ![alt text](/path/to/img.jpg "Title")
  • Reference,引用方式:
    1
    2
    ![alt tex][id]
    [id]: /path/to/img.jpg "Title"

无论哪种方式得到的结果都一样:

1
<img src="/path/to/img.jpg" alt="alt tex" title="Title" /></li>

代码块

在普通的段落中,我们可以给使用反引号 ` ,也就是ECS键下面的那个 ` 键, 从而将代码插入到普通段落中。这样可以使得普通段落和代码块的之间界限分明。还有一点就是 & 和 < 、 > 这几个符合是HTML的命令实体,需要转义后才能以普通字符的形式显示。但是在反引号 ` 包裹下的所有字符都只被当作普通字符,而不需要而外的转义操作。这就很方便在Markdown文档中编写HTML的示例代码:

1
2
3
4
I strongly recommend against using any `<blink>` tags.

I wish SmartyPants used named entities like `&mdash;`
instead of decimal-encoded entites like `&#8212;`.

HTML:

1
2
3
4
5
6
<p>I strongly recommend against using any
<code>&lt;blink&gt;</code> tags.</p>

<p>I wish SmartyPants used named entities like
<code>&amp;mdash;</code> instead of decimal-encoded
entites like <code>&amp;#8212;</code>.</p>

最终在网页上显示的效果:
I strongly recommend against using any <blink> tags.

I wish SmartyPants used named entities like &mdash;
instead of decimal-encoded entites like &#8212;.
如果希望将整个代码块进行格式化,那么将代码块中的每一行缩进4个spaces或1个tab。其所产生的效果和使用反引号 ` 标记的代码块一样,其中的 & 、< 、> 这些符号都被自动转义了:
Markdown:

1
2
3
4
5
6
If you want your page to validate under XHTML 1.0 Strict,
you've got to put paragraph tags in your blockquotes:

<blockquote>
<p>For example.</p>
</blockquote>

HTML:

1
2
3
4
5
6
7
<p>If you want your page to validate under XHTML 1.0 Strict,
you've got to put paragraph tags in your blockquotes:</p>

<pre><code>&lt;blockquote&gt;
&lt;p&gt;For example.&lt;/p&gt;
&lt;/blockquote&gt;
</code></pre>

最终在网页上显示的效果:
If you want your page to validate under XHTML 1.0 Strict,
you’ve got to put paragraph tags in your blockquotes:

<blockquote>
    <p>For example.</p>
</blockquote>